Thursday, March 17, 2016


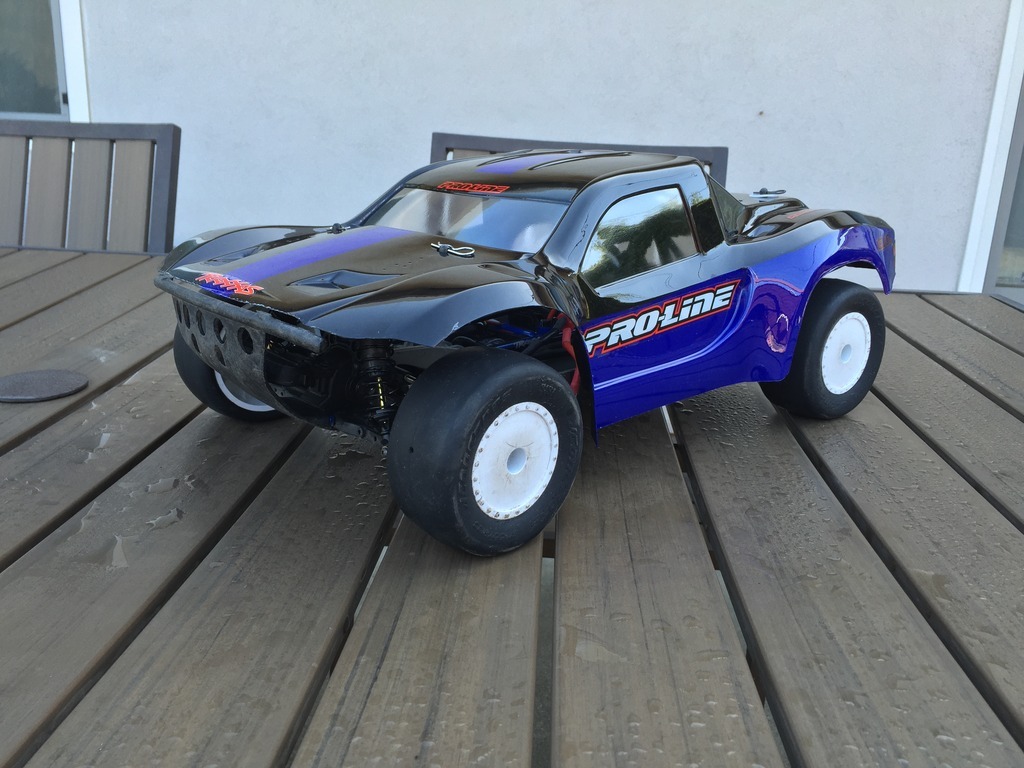
Painted up a new body for the Slash 4x4.  It’s a Pro-line Evo SC.  It doesn’t fit quite right, the front sticks out too far and basically has to be cut off, but the rest of the body seems good.  I sprayed it with some truck bedliner on the inside to make it a bit more durable.
The color scheme of purple and black with white and red accents came out pretty cool-looking!

Sanwa/Airtronics MX-V LiFe battery

image

I spent 20 minutes installing a LiFePo4 battery in MX-V transmitter.  The radio comes with a 4AA battery holder stock, but it’s basically meant to let you use a battery.

Conversion was pretty easy, you just need a Futaba connector kit and crimp tool.  LiFe batteries are much safer than LiPo batteries and run at 6.6v, so they’re a nice battery type for radios.  You don’t have to worry about leaving them charged or discharging them too low, just keep it above 5v.

I find the LiFe batteries last a really long time between recharge, so skip out on AA’s and get a LiFe!

Wednesday, March 9, 2016

GTR shock testing

I spent a few hours testing my new shocks, and have to say they are working awesome.  The front isn’t slamming down on the ground like before, I’ve pretty much settled on black front SCTE springs in the front, and blue front SCTE springs in the rear.  I still need to play with shock positions and oils, but this is getting pretty close.

Another issue that came to my attention is that the stock servo saver can’t keep up with high-traction situations.  I have a brand-new steering rack, including spring, and it still gives on the track when running slicks.  I never noticed this before with black wheels, because you can’t really see what the wheels are doing, but with white dish wheels it’s super-obvious and you can clearly see the wheels wandering mid-corner as the servo-saver gives and catches.

I’ve gone to a full STRC aluminum bellcrank system and it’s working great even with the servo saver backed off all the way.  You definitely need to make sure you’re using a metal servo with the bellcranks, because they don’t give as much as the plastic Traxxas one.  It’s amazing how much better the steering is, the precision is night and day.  Highly recommended if you are running on high-traction surfaces.

Rear GTR shocks on the front

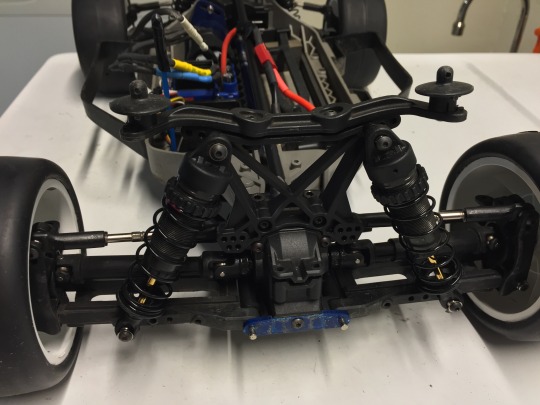
I did the rear shock tower mod on the front as detailed by others, and put full rear GTR shocks (0 limiters) on.  The main issue with the rear shock tower is that it’s 17mm wider than the front shock tower, which means your shocks are mounted out way too far, especially when considering the taller mount.  Extrapolating from the stock shock positions, with the taller tower you would want to mount the shocks even more inward on the tower!

Most RC cars have the front shocks laid down flatter in the front than the rear.  Going to a rear shock tower makes that more difficult.  To combat this, I mounted the top shocks all the way inward, and the arm mounts all the way out.  It’s still too vertical for my liking, but that’s the best I can do at this point.


image


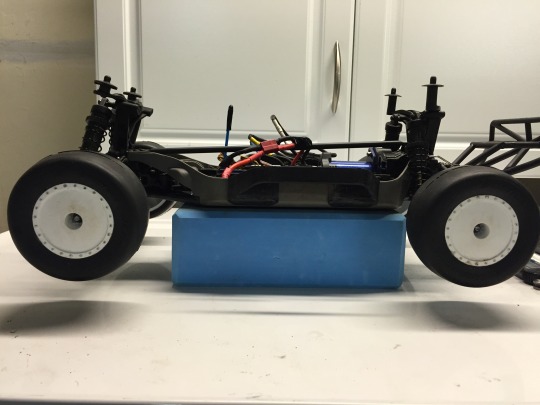
This also got my droop about where I wanted it front and rear.  At full extension, my wheels are about the same front and rear, with the front slightly higher (6mm) than the rear.  I don’t recall the stock droop on the front, but it was something like 14mm shorter than the rear, which is a massive difference.  I now have 42mm of shock travel at full extension, which should soak up the jumps much better than before.


image


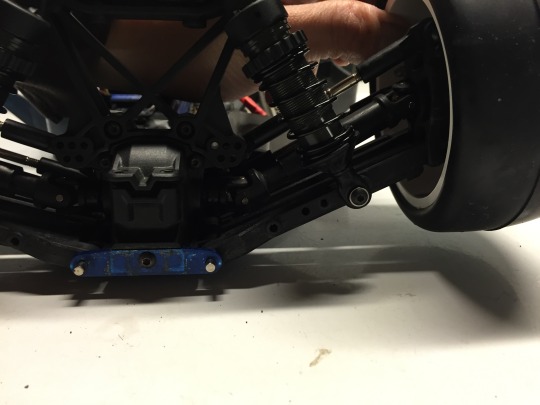
And the one thing I don’t see people talk about when mounting long shocks on the front is the compression distance on the front arms.  Thisis why you pretty much have to use a taller shock tower on the front when using longer shocks.  You need the wheel to be able to compress past the bottom of the chassis so that you have some additional room when landing cockeyed on a front wheel.


image


Even with the chassis bottomed out, the front wheels still have room to give.  You need this, else your shocks will get slammed when landing off-center a little bit.

Sunday, March 6, 2016

Slash front shock issues

There are a few things I don’t like about the design of the Slash, the main one that bugs me is the front shocks.
The Slash 4x4 uses the same shocks as the Slash 2WD, which uses the same shocks as the Rustler and Bandit.  Those vehicles are a lot lighter than the Slash 4x4 and have typical, short, buggy-length front shocks.
Well, that just doesn’t cut it on a 4x4 short course truck.  Traxxas maintained the short shocks for obvious manufacturing and parts reasons, but also to keep a short shock tower to fit under the hood of a short course body and not look ridiculous.
This has compromises in performance.  Let’s talk about them more:
1. Limited spring selection.  The GTR shocks are 13mm bore, and pretty much the only decent spring selection is Losi SCTE shock springs.  These fit the rear shocks pretty well, but are too long for the front.  There are GTR springs, but I have some issues (described below) with them.
2. Minimal droop.  This bothers me the most.  The LCG chassis is very low to the ground, only 23mm off the ground with arms level, which is overly short for a heavy short course truck.  Standard buggies are about 24mm of ride height, and they have smaller wheels!  So clearly 23mm of clearance is not going to cut it.  In addition to this, the front shocks barely extend far enough to give any droop, which means you have very limited shock extension in the air to absorb landings.  As a compromise, you have to use fairly stiff springs and pretty heavy oil to avoid chassis slap on pretty much any sort of jump.
3. Weak GTR springs.  I find the GTR springs wear out pretty fast and sag quickly.  I’m not sure if it’s spring quality or what, but they don’t last very long in my experience.  Being able to use longer springs that still fit should provide more consistency.
4. This is just a theory at this point, but I believe this also exacerbates the nose-dive situation of the truck.  The Slash 4x4 nosedives a LOT, partly because the front shocks cannot extend very far when jumping off a ramp.
I tried to fix 2. by shortening the rear shocks to have roughly equal droop front and rear, but that was more of a band-aid solution.  It kept the front and rear balanced at least and the car drove very flat, but the chassis slapped way too easily with the limited droop. I just recently found out about 3., and 1. was an issue, but I was getting by with using GTR blue springs.
The next post will detail how I am going about addressing these issues.

Thursday, February 25, 2016

Team Associated vs. TLR

There’s no doubt that in the USA, the two main competitors when it comes to race-level RC cars is Team Associated (AE) and TLR.  Go to any major race in the U.S., and drivers for these two brands will be at the top duking it out to stand atop the podium.

Having owned a couple of AE cars (B5 and B5M lite) and TLR cars (22SCT 2.0 and 22T 2.0), there are definitely some different design philosophies at play here that reflect each company’s character.  I thought I’d go over the main differences you’ll find when you purchase one of the two competitor’s kits, and overall who I feel has the advantage in each category.

Manuals:
I find the Associated manuals a little more accurate with fewer mistakes, but the TLR manuals tend to be a little more like technical books with nice CAD drawings.  I like the fact that AE manuals are English specific and have additional tips and tuning suggestions, while the TLR manuals are language-free and uses symbols which is less readable for Americans.

Advantage:  AE

Plastics:
The AE plastics feel like they contain more fiber content and usually beefier than their TLR counterparts.  AE plastics also have a softer feel to them, although they are quite firm.  TLR plastics feel like they have a harder shell with a softer core almost.  Both plastics are fine, but I like the feel of the AE plastics better and I feel like the screws thread into them a little better.

Advantage:  AE

Metals:

I find the TLR metals parts to be of very high quality.  The anodizing is really clear and even, the metals are sturdy, even the ballstud spacers are amazing.  AE metals aren’t bad, but seem a half step down from TLR parts.

Advantage:  TLR

Design:
There’s no doubt that the AE line of cars are very elegant and are put together with fewer parts.  The 22 2.0 line of cars are a little more fiddly, like someone grabbed a bunch of LEGO bricks together and slapped them together, but this may be in part due to having a convertible rear and mid-motor platform.  The steering bellcranks in particular are horribly fiddly.  TLR cars also tend to be very adjustable, and they like to use shims to angle and adjust kickup, anti-squat, etc.  Whereas AE tends to use inserts and different parts to make adjustments.

Advantage:  AE

Shocks:
TLR makes hands-down top-shelf shocks.  There is no comparison.  The pistons are machined, the caps are machined aluminum, the bleeder screws use copper seals, they are awesome.  The fit and finish is amazing and the final product is super-smooth and doesn’t leak.

AE shocks feel more like a mass-produced budget shock and usually need some upgrades to get them halfway decent (V2 pistons/shafts, X-rings).

Advantage:  TLR

Tunability:

Nearly all TLR parts are interchangeable across all of their platforms, and as such there is a plethora of factory tuning parts available.  You can get parts in plastic, brass, aluminum, titanium, etc., different height ballstuds, different width hexes.  In fact, there are usually so many interchangeable parts, it’s easy to get confused on what part is actually kit and what setting the kit is at!

On the other hand, the aftermarket is usually more limited for TLR cars and for the AE kits this is one of their strengths.  So I would say factory parts the advantage goes to TLR, and aftermarket parts the advantage goes to AE.

Advantage:  tie
Wednesday, February 10, 2016

Setting your steering

This is the proper way to set up your steering.  It’s important to follow the steps in order so that you have even throw left/right, and getting full throw as well as the proper steering curve.

1. Set trims on radio to 0. 

2. Set steering EPA to 0 and steering Dual-rates to 100%.

3. Set your steering links to the same length.  I use a set of calipers to make sure they are exactly the same length.  This is important so that you get equal throw left and right.

4. Aim your bellcranks so they point straight ahead and attach horn to servo (at neutral) as close to 90 degrees as possible from the linkage it attaches to. On some cars, this is not straight up and down on the servo, the recommended angle may be less than that.  For example the Slash 4x4 LCG wants your servo set one tooth to the right of 90 degrees.  The manual may tell you what length the linkage is supposed to be.  It’s important the linkage is the right length.

5. Attach linkage/bellcranks to your servo horn.  Now everything is hooked up.

6. Adjust trim so that car drives straight forward.  Don’t worry if they toe-in or toe-out at this point, you can adjust this later.  The main thing is to adjust the trim so that the car drives in a straight line.

7. Set your toe-in/toe-out to 0 degrees (or whatever setting you want).

8. Set EPA (or dual-rate) so that nothing hits.

At this point, it’s possible that your left and right throw is different.  If you are able to set the End Point Adjustment much higher on one side than the other, it means your steering link that connects the horn to the bellcranks is not the right length.  You will have to shorten or lengthen it and then re-adjust your sub-trim/trim to re-center the car to drive straight.  Start again at step 4 and go through the rest of the process again.