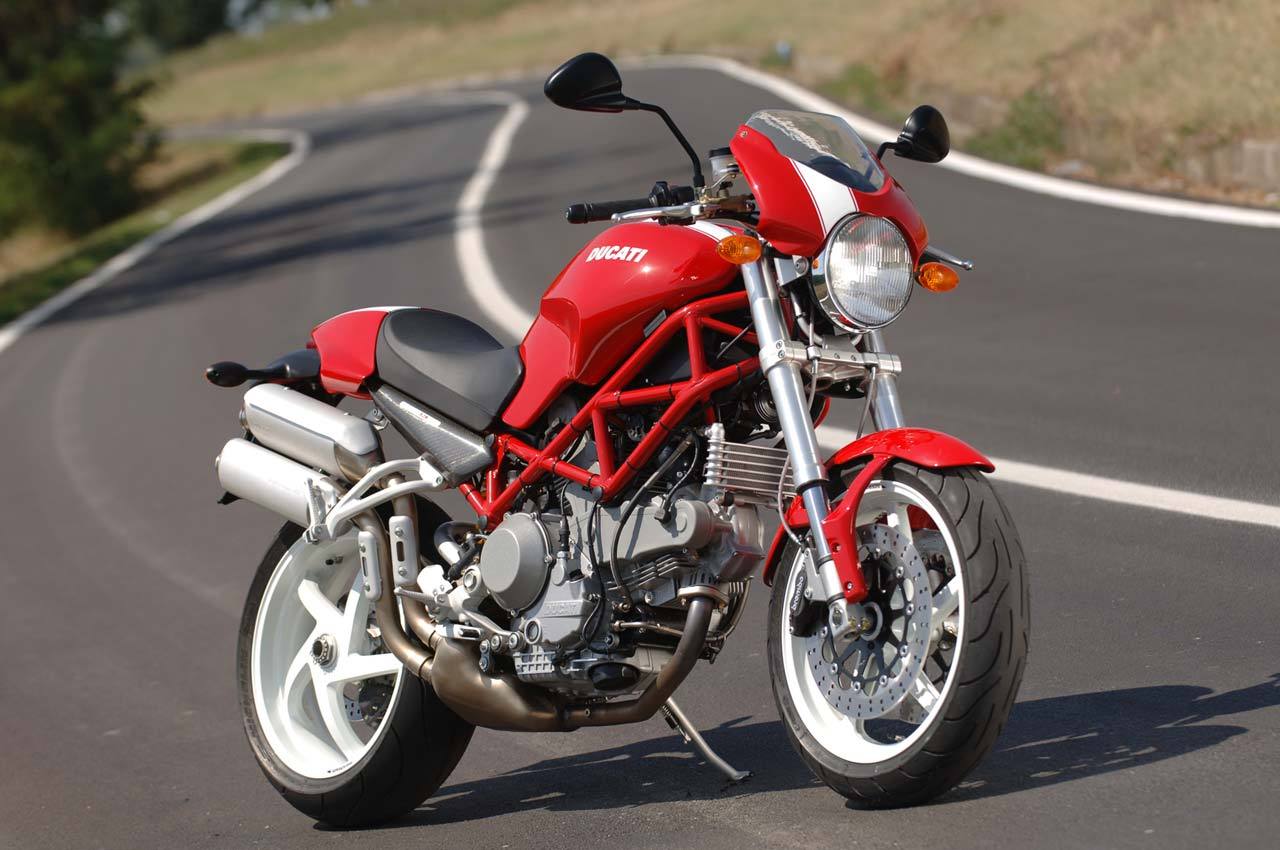
The paint scheme I’ve been using for all of my race cars pays homage to my favorite motorcycle of all time, the Ducati Monster S2R1000. I never owned one, but always wanted to get one.
Time for another review.
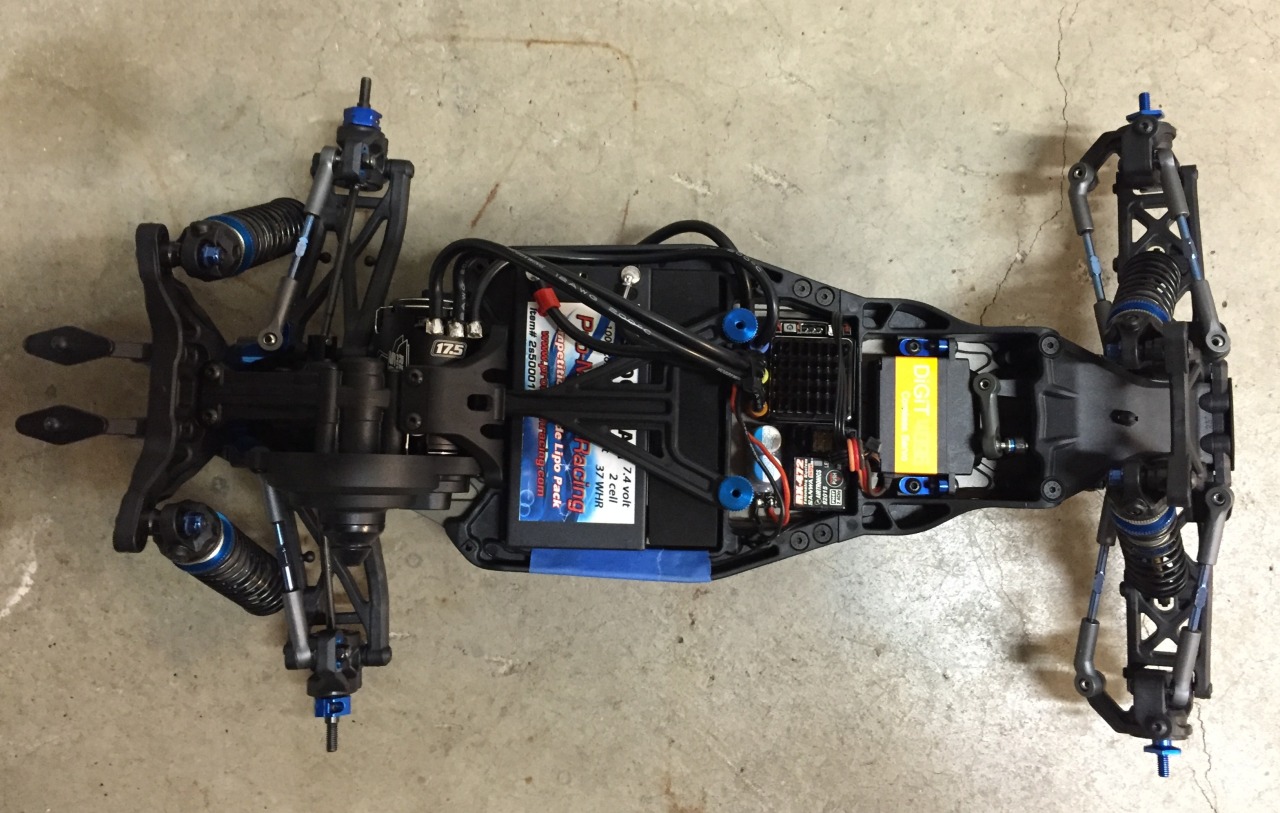
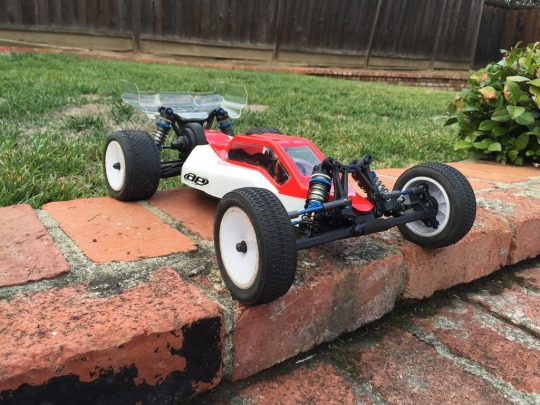
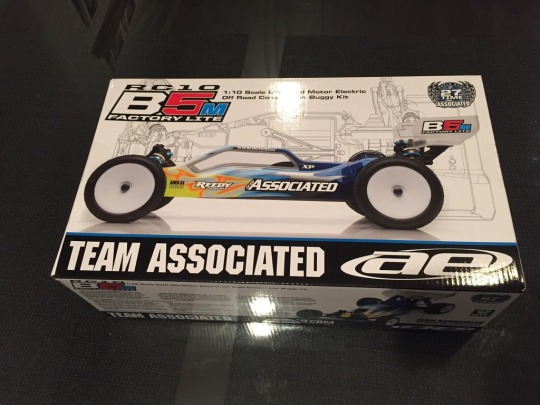
Those of you who have been following my blog know I purchased a B5M Factory Lite recently and started racing it. I’ve had about 15-20 batteries through it and feel I have enough information to do a full review, so here it is.
Overview
The B5M has been out for a couple of years now, and won a bunch of races and is the successor to the very popular B4.2. Team Associated came out with two versions of the car, the B5 (rear motor) and the B5M (mid-motor). Probably 90% of sales were for the B5M, and since its release they updated it to the B5M Factory Lite.
The Factory Lite (FL) is targeted primarily at 17.5 stock racers, and features some nice improvements over the original B5M to lighten it – titanium turnbuckles, aluminum front hexes, V2 slipper, 3-gear transmission, and a milled chassis. It also has an aluminum rear camber block, which is an improvement over the original plastic one.
It also features the B5 arms (flat front arms, B5 rear arms) which smoothens out the steering and makes it a little quicker turning. It’s basically the best of everything.
I built mine up as a stock spec 17.5 buggy, using completely kit parts except for V2 shock shafts/pistons and X-rings. Fully ready-to-run, it weighs in at 1525 grams.
Build: 10
The build went very nicely. I was familiar with the platform, having built a B5, but after going through a Losi/TLR phase, it was surprisingly refreshing to build an AE kit. AE kits are definitely well thought out, the instructions are clear, and I feel like the plastics and screws are of slightly higher quality than TLR kits. The plastics are a little firmer and easier to properly thread screws, and the screws are a little sharper and more durable in my opinion. No issues with the build, it went together perfectly.
Performance: 10
The car just plain kicks ass. With some decent electronics, the buggy rips. It handles predictably, it jumps neutrally, it accelerates and brakes well. I find it to drive very well out of the box with the kit setup. I think the only thing I changed was dropping 1mm on the rear camber block, else it’s a completely stock setup.
There is less forward and rear weight shift as compared to my B5, and it definitely corners flatter and with more speed. With the B5, you can feel the rear end swing around in the corners. It doesn’t plant the rear tires down as much as the B5 – the B5 definitely drives better in slick conditions, but in high-bite there is no comparison. I’m probably 0.5 seconds/lap faster (on a 16s indoor track) with the B5M.
The shocks are not quite as smooth as TLR 22 shocks, but they work just fine for me.
The car is also extremely light – it has the factory team bearings and weighs only 25 grams over ROAR minimum, and this contributes to the amazing acceleration of the car.
Durability: 9
With the B5, I did break a few parts – front shock shaft, front A-arm, front turnbuckle, rear hubs, but on the B5M FL all of those parts have been upgraded/redesigned.
It’s got titanium turnbuckles, a redesigned rear hub (longer ball stud with a nut and washer), and I’m using V2 titanium-nitride shafts. The car isn’t unbreakable, but so far I haven’t broken anything on my B5M FL. I’ve done some gnarly cartwheels and lawn darts, but it’s held up great. Even the wing has taken some solid abuse and still looks OK.
It could be that the lighter car makes it a little more durable, but my B5 was only 40 grams or so heavier.
Value: 10
At $279, the buggy is basically the cheapest race buggy on the market. Considering what it comes with, it’s really the best deal out there. You have aluminum shock bodies, titanium turnbuckles, a hard-anodized milled chassis, aluminum hexes front and rear, wow. The TLR 22 costs $60 more, the Kyosho is $100 more, and the Euro cars are expensive also. Yes, you don’t get wheels, but the price is low, low… low!
Support: 10
AE customer is great, and there are more setup sheets and team drivers for AE than any other brand. Probably more than all other brands combined! I’ve gotten quick responses via e-mail from their support staff, and there is a lot of info online and on AE’s website on improving your car.
Dislikes
I honestly can’t think of anything. It’s not as smooth driving as the TLR 22 2.0, but I like the aggressive nature of the car. About the only thing that’s annoying about the car is that you need to glue in the front hub inserts, else they tend to get sloppy. But it only takes a couple of minutes and everyone uses 4mm of trail, so it’s not a big deal.
Conclusion
The car drives awesome, it’s cheap, and it has the best support. If
you’re not a brand-o-phile, you really can’t go wrong with the B5M
Factory Lite. The only problem you’ll have is that the car is so
good, everyone at your local track will have one!
At the time of this post, the TLR 22 3.0 just came out and from what I’ve seen of it at the track, it looks as good as the B5M FL, if not better. I’m going to have to get my hands on one eventually, but for now I’m having so much fun with the B5M it may be a while.
Graduated from rookie class into Sportsman, and first race with the 17.5 B5M Factory Lite, and I qualified into the Expert A-main! Pretty crazy. 12 Experts and 4 Sportsmen, and I qualified as the 6th Expert overall. They bumped me into Expert because of my times.
Finished 8th in the race (out of 8), but was pretty psyched just to make the Expert A-main. Fastest time of 15.05, beating my previous 15.1.
This buggy just plain kicks butt. I’m running completely out of the box kit with no extra parts. Insane.
I did some more practice with the B5M lite, and with the current electronics it’s pretty freakin’ fast for a 17.5. I’ve got a 17.5 Reedy M3 short stack, Hobbywing V3.1 Stock Spec, and Pro-match 100C 5000mah shorty in there, and it rips pretty good. There are faster cars out there, but this thing is pretty good for $250 in electronics.
Nothing else special on the car, just some Avid metal shielded bearings and v2 AE pistons, otherwise it’s completely stock.
I’m having a lot of fun with this car, definitely want to see what my times are the next time I go out to the track.
I will say that this car is pretty sensitive to changes. I was running 22mm rear ride height, and it drove pretty terrible. Bumping back up to 24mm and it was on rails.
I sold my TLR 22SCT 2.0 on rctech.net, I just wasn’t driving the car very much and never really got along with it, to tell you the truth. I bought the car to experience what the Losi’s were all about, and to drive with my son in Rookie class. Towards that goal, the car was a success. But I found the TLR a bit fiddly, and I just could not really get it to put the power to the ground very well. It was a difficult to drive car, although it did force me to become extremely smooth. I always got a lot of compliments on my driving technique when I drove that car, because you really just could not make any sudden moves with it.
That said, I really enjoy my 22T 2.0 and plan to keep it for a while. I will probably also get a 22 3.0 some time in December, maybe even earlier if I can find a good deal during Black Friday.
On the plus side, with the funds from the SCT, I was able to pick up a car I’ve been wanting to get for a long time. The premiere 17.5 stock class buggy is the B5M Factory Lite, and Tower delivered it to my house today. I got most of the chassis and front end done in a couple of hours today, it’s off to shocks and rear end tomorrow and the diff and transmission Wednesday. With any luck, it will be ready by the weekend.
After having worked on TLR cars for the past year, it was actually nice to work on an AE car again. I was reminded just how elegant the cars really are, and the high quality of the materials. As much as I like to support the smaller companies, you just can’t go wrong with an Associated kit.
I’ve been working on getting the setup going on my TLR 22T 2.0 that I bought used. It had a set of JConcepts Gold Dirt Webs, and I was fighting front end bite. Rear bite was great, but the front would not stick that well and the car was pushing a bit on corner entry and not rotating very well.
Well, another racer tried out my car and we were talking about tires and he mentioned that the rear foams were quite soft and the front quite firm. I checked, and yup, this was true. Swapping the fronts and rears made a huge difference – adding front end traction immensely while reducing rear, which helped a ton in the corners to get the car to change directions.
So if you have a car with same size 4 wheels, check your foams and rotate the tires as needed to add traction/reduce traction from the end as needed. Cheap and easy tuning tip!
My friend Alex was having trouble getting enough drive with his Slash 4x4 at our local indoor high-bite track. We switched the center diff to a slipper clutch to get more power down for the whoops section, but he had the slipper tightened all the way down.
As a result, there was nothing in the drivetrain to absorb the shock of wheel/motor RPM mismatches, and the weak link in the drivetrain broke – yup, you guessed it, the thin little plastic prongs on the half-shafts. After 3 sets of these things, we figured it out.
So if you’re breaking half-shafts on your Slash 4x4, check that your slipper is not set too tight! You need it to be able to slip in heavy shock loads to the drivetrain.
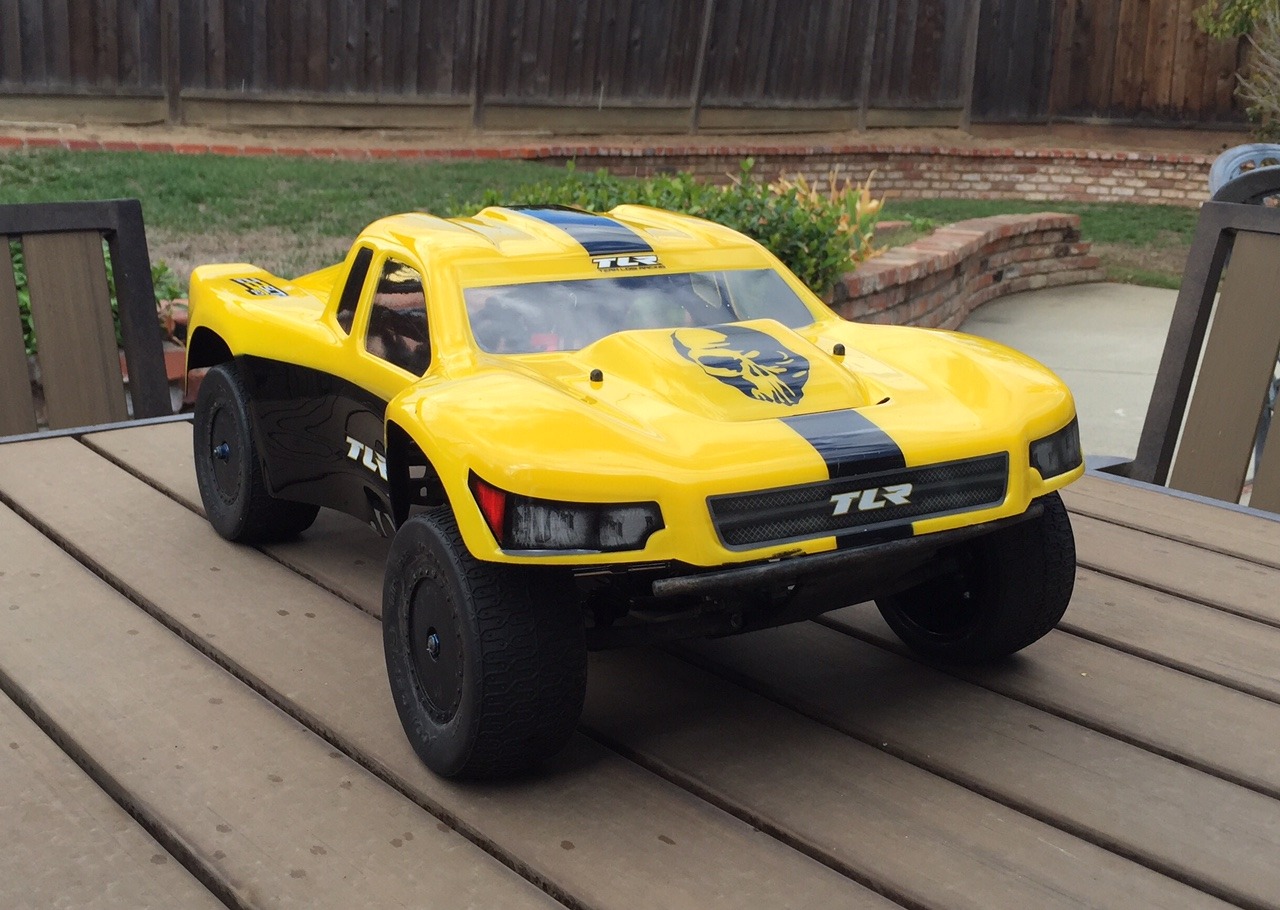
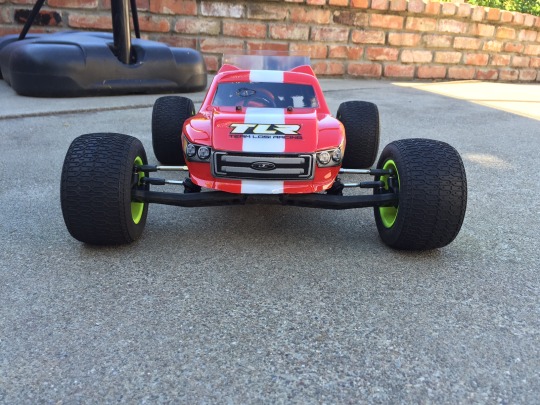
Got a new body for the 22T, it’s a Jconcepts Finnisher body for the mid-motor 22T 2.0. Here’s a first look at my truck:
After 4 races, I have two 1sts, a 2nd, and a 3rd. Final race is next week, basically me and another guy are tied in points so whoever wins next week will win the series. Wish me luck!
I also made a slight change to my setup, dropping to 21mm ride height on the front of my B5. Gives it a little more corner entry steering.
Been racing, and here’s a comparison of laptimes. With my TLR22SCT2.0 (9.5t motor), best time was 18.4 seconds.
With the TLR22T2.0 (10.5t motor), best time of 18.2 seconds.
With the RC10B5 (13.5t motor), best time was 17.7 seconds. With some setup changes (more punch, new tires, geared taller, glued front hub inserts, extra steering EPA), got that down to a pretty amazing (for me) 17.0 hero lap.
The other two kids in the rookie class are doing 16.9 and 17.0, so it should be pretty close racing this Friday! We’re doing mid-pack 17.5 buggy Intermediate (between Sportsman and Expert) times and laps, so this is a pretty tough rookie class!
Two more races in the series, I’m second in points.
Those who have been into RC cars for a while will know by now there are two types of shocks: emulsion and bladder.
What this refers to is the mechanism by which the shocks use air to compensate for shock shaft space. When you take a shock and move the piston up and down, you’ll notice the shaft goes into and out of the shock body (duh…).
What’s happening though is that the piston shaft takes up additional space inside the shock body, and so somehow that needs to be accounted for.
Shock fluid doesn’t compress. So, when the piston goes into the shock body, how does that work? Well if you’ve ever built a shock and completely got rid of all of the air inside of it, you’ll experience hydro-lock, which is basically where the shock piston won’t move at all. It just will not compress unless you use a ridiculous amount of force. This is bad, because obviously you want your shock to work and actually compress and rebound as it absorbs bumps.
It’s clear the air performs some function then, and what is actually happening is that when the piston moves into the body, the air inside the body compresses, and then when it extends, the air decompresses back to its normal size/volume. So the air acts as a bit of a spring effect to allow the piston to move in and out.
There are two main designs to handle the air: bladder and emulsion. Let’s look at them more in detail.
Bladder
These types of shocks are named after the little rubber bladder/diaphragm inside of the shock at the top inside the shock cap. Traxxas shocks use these, as well as some older Losi shocks. What the bladder does is separate a little pocket of air inside of the cap from the shock oil in the rest of the body. They’re designed to compress (compressing the air above the bladder) as the piston moves in, and expand again as the piston extends.
The nice thing about this design is that it’s a little more straightforward to build the shocks. Here’s a quick list of instructions:
If you keep the shock level, and slowly screw on the cap until it’s almost sealed, all the air should escape out when you push the piston in halfway, and then you should have a (mostly) perfectly built shock. It’s not super-precise, but you should be able to get it relatively close. Make sure the bladder is fully seated in the cap and is not deformed/pinched.
The bladder also act as an airtight seal for the shock cap.
Emulsion
Emulsion shocks work a bit differently. Most high end RC race cars use emulsion style shocks. Instead of a bladder to separate the air from the oil, they’re designed to have air mixed (or emulsified) with the oil. Thus the name emulsion.
The good thing about emulsion shocks is that they’re a simpler design than a bladder, and you can tune the amount of air vs. oil in the shock. With a properly built shock, there will be some rebound and suction when the piston is fully compressed/extended. This is normal, and the amount of rebound/suction will depend on lots of things (piston drag, O-ring/X-rings, shaft material/smoothness, etc.) in addition to the ratio of air and oil.
With emulsion shocks, when you build them, you will have to decide how much air you want in the shock. In a fully working emulsion shock, the air has already lathered with the oil and distributed itself throughout the body into tiny little bubbles. As the shock compresses, the tiny air bubbles compress. As it extends, the tiny bubbles expand. The more air in the shock, the more easily the shock compresses. When you build the shock, all the air is at the top, but when it’s working, the air gets spread out throughout the body.
The best way to build an emulsion shock (IMO):
You will want to make sure both shocks (left and right) are retracted exactly the same amount in step 6. The more you retract it, the more air you will be reintroducing into the shock.
It’s important that both shocks have exactly the same amount of air. You should NEVER pump the shock after you’ve reintroduced air in step 6, because it will start mixing with the oil and it will be impossible to get the same amount in both shocks once they have mixed. If you do pump the shock and mix the air and oil, you will have to start the whole process over again.
When you’re done with step 7 and closed off the whole shock, then you can pump the shock and get the oil and air fully mixed/emulsified. If you’ve done it right, your shocks should compress and retract the same and work identically.
Final thoughts
I hope this post helped you understand the two types of shocks and how to build them. Emulsion shocks, in particular, are hard to find information on, so hopefully this helped you better understand the mechanics of how they work and why they work. Remember: air is OK to have in the shock. In fact, you have to have air in your shocks, else they will not work. Just make sure your left and right shocks have the same amount.
Finally started to do some actual RC racing at my local track. While I’ve driven on the track a lot and did some for-fun races, I never got into the serious end of the hobby.
Well, that’s all over now – I did my first official race running the Rookie class, which is basically a “run what you brung” class. The only requirement being 2S batteries. There were 10 racers, about half of which ran SC trucks, and half buggies.
I actually thought a fair bit about what car to run, and with the current layout of a fairly tough rhythm section, I knew I wanted to use a 2WD vehicle (see my center diff post to see why a 4x4 is hard to drive). While I am probably a little bit quicker with the Associated B5, the TLR 22SCT 2.0 is more forgiving to drive, and more importantly, crashes better! The Rookie races often devolve into bumper car sessions, and the full-bodied SC truck handles collisions and rollovers a lot better than the buggy, so I went with that.
I TQ’d the two qualifiers and led wire-to-wire in the race, which was nice. I actually only set the 4th fastest lap in the race, but avoided any real crashes. Like they say, to finish first you gotta first finish.
There are 4 more races in the series (with 1 throwout), so hopefully I can continue to do well and finish at or near the top at the end.
One of the most misunderstood tuning options for the Slash 4x4 is the center differential. I’ve read a lot of posts on center differentials, and the majority say: use a slipper clutch for bashing, and a center differential for racing.
I would agree with that statement, but why is that? To understand why, you have to first understand what the two devices do and the differences between them.
Slipper Clutch
In a Slash 4x4, power is normally distributed equally front to rear, left to right.
50% of the power goes to the front, 50% to the rear. And at each end there is another differential that allows the left and right wheels to turn at different rates. When going straight, the left and right wheels will turn at the same speeds. When turning, the outside wheel needs to turn faster than the inside wheel. I think most people understand that.
What the slipper clutch does is allow the whole drivetrain (all the power in the system) to slip when necessary. The tighter you make the slipper clutch, the harder it is to make the drivetrain slip. The looser, the easier. When does it slip? When the motor is trying to turn at too much of a different rate than the wheels. When you take those giant 20 foot jumps and land with the car going 20 mph and the motor pinned at 40mph, the slipper will slip instead of grenading your drivetrain. This is a good thing and prevents parts from breaking.
You can also do some tuning for low traction conditions: when you mash the throttle and the motor tries to turn at a ridiculous speed, a looser slipper will slip rather than instantaneously try to apply full power and spin the wheels. This is often used in 2WD cars to provide a primitive form of traction control.
Center Differential
Now the center differential is more complicated, and nearly everything I read about it on Slash forums is wrong. At its most basic, the center differential allows the front and rear wheels to rotate at different rates, much like the front/rear differentials allow the left and right wheels to rotate at different rates.
Why is this helpful? This link has the best description I’ve seen, and I never see anyone explain this simple concept, even though it’s extremely important:
http://4x4abc.com/4WD101/abc4.html
Most people say “You need a center diff to handle better. You need one for racing. It drives better”. Well OK, but why? What does “handle better” even mean? In what way does it “drive better”?
In a turn, the front wheels and rear wheels need to rotate at different speeds because each wheel is not following the same line in a turn! The outside front wheel has to travel the furthest, and the inside rear wheel the shortest. So to keep each wheel spinning at its correct rate, the front output shaft from the center diff needs to turn faster than the rear output shaft.
This is what the center diff does – it allows the front wheels to turn faster than the rears. Or: in a turn, more power goes to the front and less to the rears. If you lock down the center diff (super thick fluid, or use a locked down slipper), the front and rears have locked down output shafts and cannot spin at different rates.
A slipper clutch can’t produce the same effect – power is always equal front and rear, it only allows the whole system to slip, not individually front and rear.
This is why 4-wheel drive cars “handle better” with a center differential. The wheels can follow their natural line more easily. As a result, the car doesn’t push as much and will follow the line you’re pointing the front wheels at.
Center diff: wheelie control
Another effect of a center differential occurs when only two wheels are on the ground. With a tight slipper, you can easily wheelie with a powerful motor, because the front will lift (rear will squat). The rear wheels will still get their normal % of power no matter what you do and will continue to drive the car forward (or upwards!).
With a center diff, as the front wheels rise and start to lose traction, it automatically starts transferring power to the end with less traction. The rear wheels are stuck to the ground, but the fronts are in the air and able to spin more easily. Since they can spin more easily, they do, and power will transfer to the wheelying front wheels and away from the rear. This reduces overall motor power applied to the rear. You can tune the anti-wheelying effect of the center diff by using thinner/thicker fluid.
While big wheelies look cool, they usually aren’t the fastest way to accelerate. By not wheelying, you may be able to accelerate faster! Advanced race motorcycles usually have anti-wheelie control to accelerate the bike faster, and the same concept can be applied to RC cars. It’s also easier to steer when the front wheels are on the ground…
Center diff: disadvantages
So we’ve talked about all of the great things about a center diff, what are the downsides? Well, first, the device is much more complicated and prone to failure than a simple slipper clutch. It’s also more work to maintain and tune and get right, since you have to remove it, drain it and refill fluid. With a slipper, you just take a wrench, adjust it, and you’re on your way again in 10 seconds or less.
Another effect I found is that there are sometimes track features where you still want maximum power applied to the (rear) wheels when you only have 2 of the wheels on the ground (2 in the air).
At my local track, the current layout has a set of 3 small doubles that we call the rhythm section. You basically have very small windows in which to jump the car, land it, and then immediately jump again. And you have to do this 3 times in a row.
With the very small area in which to jump, land, and then jump again, it’s very difficult to land all 4 wheels at the same time perfectly. If you don’t, however, when you hit the throttle to go off the next jump, power will be bled away from your (rear) drive wheels to the wheels in the air. The overall effect is that you don’t get very good drive, and it’s difficult to generate enough momentum to make the next double.
With a slipper, this effect is negligible. With a tight slipper, even if only the front wheels or the rear wheels land, you can still get very good forward drive (just like you can when wheelying) to accelerate the car and make the next jump. I actually convinced my friend Alex to put a slipper clutch in his race Slash 4x4, just to make this section easier to do, and he found the results profoundly better.
In a 2WD car, the rhythm section is also fairly easy because you always get full power applied to the drive wheels to help you accelerate for the next double. Even expert 4x4 short course drivers (using a center diff) have a difficult time making the series of jumps, while it’s fairly simple in a 2WD short course truck (my TLR 22 SCT, for example).
The final disadvantage of a center diff is that it does not protect the drivetrain as well as a slipper clutch. When you land all 4 wheels at the wrong speed (relative to the motor RPM), there is nothing to slip and bleed power off. The best it can do is bleed power off to a wheel that has less traction, but this isn’t always possible. Overall the drivetrain will take more of a beating.
Conclusion
I hope you learned a few things about slipper clutches and center diffs and how they work. It took me some serious thinking and research to figure out exactly why a center diff was better (and sometimes worse) for racing, and I hope I’ve shared that knowledge with you.
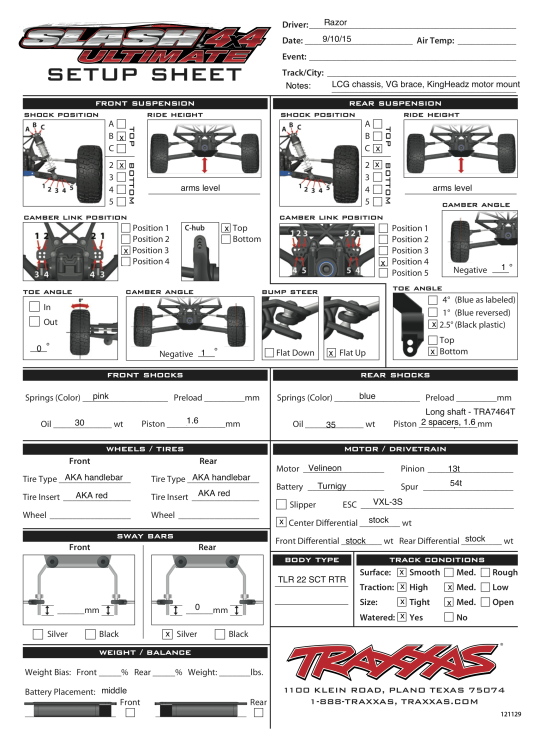
Some people were asking what my current setup is for my local indoor clay track. This setup is pretty darn close, it might need a little bit of tweaking, but it’s quite good IMO.
So one of the popular upgrades for the Slash 4x4 is to get a chassis brace. People think they need one to add stiffness to the chassis (which is not actually a good thing when it comes to traction), or to make the car more durable in crashes (debatable).
But the real reason to get a chassis brace is this: on my LCG chassis, the rear spline gear does not line up perfectly straight with the center driveshaft, mainly because of the flex in the chassis. In fact, because the front has a big heavy weight hanging off the front (the entire front assembly) and the rear has a big heavy weight (the entire rear assembly), the flexible plastic chassis tends to bow in the middle, and what happens is the drivetrain does not line up straight. You can see it here in this picture:
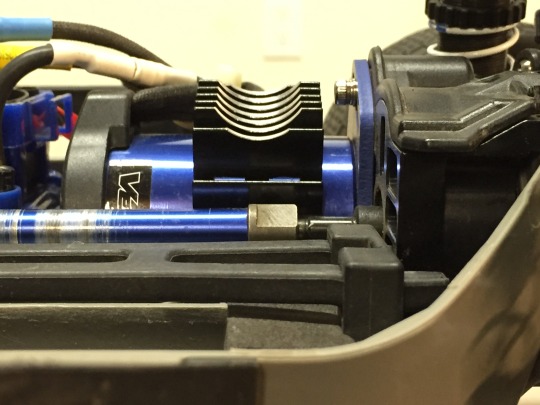
The black rear spline coming out of the motor mount section is at a slight angle and points a little bit upwards with respect to the blue aluminum driveshaft. This puts extra stress on the driveshaft, the spline, and most importantly the center motor bearing that is under the most amount of duress.
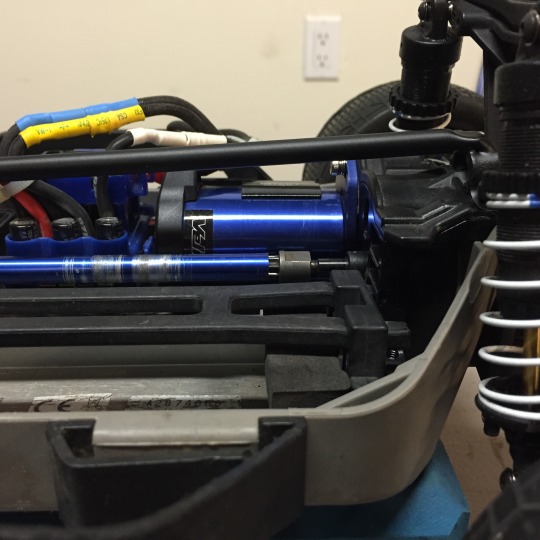
With my VG Racing center brace installed, the driveline is perfectly in-line, and will always stay in-line despite how the chassis flexes
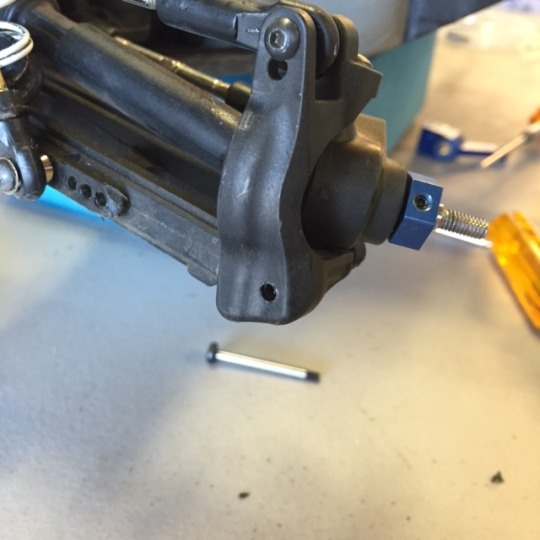
Got a new package in the mail to fix one of the annoying things about the Slash. The outside hinge pins on the arms tend to unscrew themselves after 10 minutes of running, so I got some STRC captured pins to fix this problem. Part number ST3640-RO.
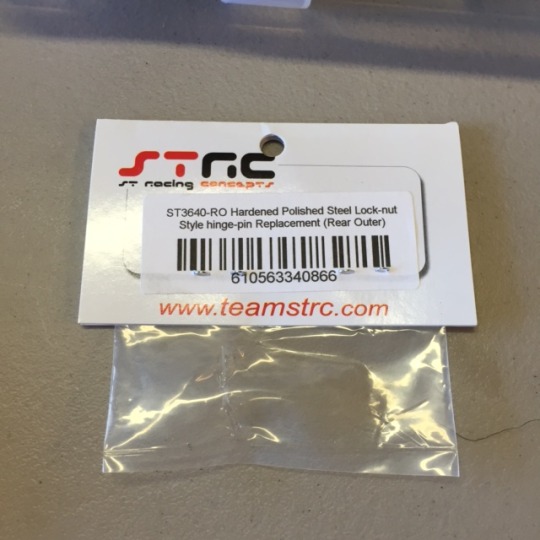
They’re meant for the Slash 2WD rear arms, but those are the same on the Slash 4x4, so they fit. Now, on my Slash 4x4, it’s only the left arm hingepins that unscrew themselves, and with some minor modification you can use them on the front arm in addition to the rear.
Drill a hole through the castor block, and it should bolt right on.
The package didn’t come with nuts, but they are standard 5.5mm locknuts
you should be able to pick up at your local hobby store or online. I had some spares.
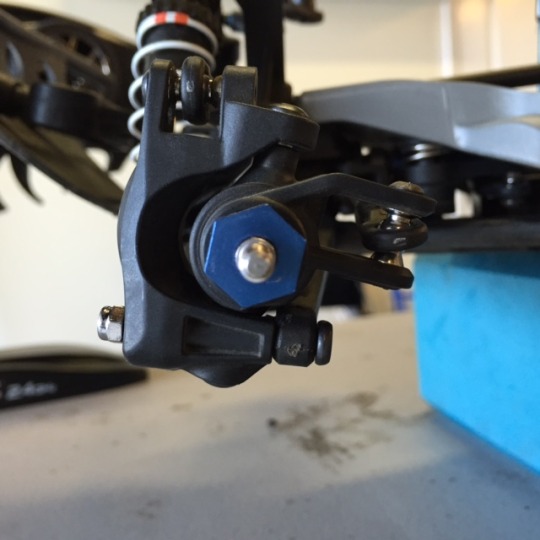
Don’t overtighten the nut down on the front, just enough to barely touch the castor block without causing any binding or additional pressure. You want the block to rotate freely in the arm.
It’s been a while, but I decided to start blogging my experiences with the RC cars I own. I now own a Traxxas Slash 4x4 Platinum, an Associated RC10B5, a TLR 22 SCT 2.0, and a TLR 22T 2.0.
I’ve owned the SCT 2.0 for about 8 months now, and have experienced the highs and lows of owning one and think I have some useful information to share. Since owning the B5, I decided to try one of the other major brands, Losi, and the SCT 2.0 had just come out and was considered one of the premiere 2WD short course trucks. A discount at my local hobby shop and $280 later, the SCT 2.0 was mine.
The build: 8/10
The build went well, the instructions are fairly clear, but when building the truck I decided to go with the Chris Wheeler setup which meant doing some research on the changes I needed to make. Referring to the stock setup sheet helps, as it’s a little unclear on the stock kickup angle, the stock toe-in, anti-squat, etc.. So it took me a while to build. This being my second kit build, I think the total time took me about 13 hours from opening the box to a fully painted and running car. What can I say, I’m slow and methodical. I also built the car mid-motor which delayed my start for a while, because the mid-motor kit was out of stock for about 3 months. I finally found one on eBay.
About the only part I did not like about the build is the TLR fascination with using a lot of different hex sizes. You need a 0.50″, 1.3mm, 1.5mm, 2.0mm, and a 2.5mm hex driver. The car is a little fiddly this way, and it’s not 100% metric – there are a couple of ballstuds and screws/nuts that are standard, which is rather annoying.
Performance: 6/10
In mid-motor configuration, you really need a few parts before the car is reasonable. One is the mid-motor brass rear pivot block. MM, this car has very little rear bite/forward traction, and the minimum you need to do to fix this is to add some rear weight. Rear springs are also too stiff (they’re designed for rear motor). I recommend the TLR 22 yellow SCT/T springs, which are a 2.0 lbs/in rate. You also want to drop down to 27.5W rear oil to start with and tune from there.
With those changes, the car is at least acceptable driving. It jumps VERY well, quite flat and predictable, it also carries pretty good corner speed with the MM placement. It feels light, almost too light really. But the weaknesses are absolutely no rear bite, and a tendency to swap ends/spin out under the slightest provocation of braking/turning with anything but perfect driving.
So the main issue with the car is that it cannot generate forward bite at all. I highly recommend looking at some of the later setup sheets (Dunford/Casper), and you’ll see a trend towards adding rear weight, softening up the rear a lot and doing everything they can towards rear weight transfer under acceleration and reducing front weight transfer.
The other main issue I have is that the stock slipper and stock diff aren’t really up to the task of the amount of power and weight this car has (in mod form). I run a mild 9.5T motor, and you have to snug the slipper almost all the way down, and you have to do the same to the diff spring to get the diff to not slip. I actually switched to an AE slipper spring, because the stock spring is quite weak.
So performance-wise, as my friend Alex would say, “this is an evil-handling truck!”.
I will say that the body on this truck is awesome. The Lexan is
super-thick, it has a nice low profile, and tons of cutouts you can make
to get it to flow air. I liked it so much, I bought a 1.0 RTR body for
my Slash.
Upgrades/Support: 9/10
Losi’s in general have a strong aftermarket as well as first-party upgrades/option list. You can do a LOT to this truck to tune it exactly to how you want it to run. The Dunford/Casper mod is to put 22T rear arms on the back to widen the rear a bit, and I did go through that work and the car does handle better, especially under bad landings and mid-exit cornering in terms of roll and exiting grip. I’ve spent a lot on TLR tuning parts (aluminum/brass parts for added weight front/rear) which is a pro and a con. It’s great that you can get these parts to get the car to perform better, but it’s a con that you kind of need them to get the truck to handle decently.
Value: 5/10
Value-wise, out of the box as rear-motor the truck is solid. You get an aluminum chassis, nice plastics, rear aluminum hexes, a quality body and wheels, all for $339. It’s pretty comparable to most high end kits, maybe a little on the expensive side. But the quality of the parts are good.
You also have the option to go mid-motor with the purchase of a reasonably inexpensive kit. But the reason I mark value only average is that you really need to invest in a fair amount of parts if you go mid-motor. You need the kit, the brass rear pivot, the aluminum front hexes, some springs and the AE slipper spring just to get started, and then probably additional brass weights front and rear and maybe the Dunford/Casper rear mod. All of which can add up to $100+.
Overall: 6/10
When it comes to high-end 2WD short course trucks, you really only have a few to choose from. I don’t know anything about Durango trucks, but other than that you have the big 3: TLR, Associated, and Kyosho.
With the release of the SC5M, it’s hard to recommend this truck over that. From all accounts the SC5M is really the hot new car to beat, and if it drives anything like my B5, it’s probably the one to get.
The Losi is super-tunable, has high quality parts, but is a little fiddly with respect to the upgrades you need to get, and the slipper/diff issue is a bit of a problem too. Some people are switching to the 22SCT RTR gear diff, and I will probably experiment with that when my ball diff needs a rebuild. If you’re a Losi 22 fan or you need rear-motor, this truck is fine and you will enjoy it and this is probably the car to get, but if you’re not brand loyal and want mid-motor for high trip tracks, I would probably give the SC5M a try.
Build tips:
If you’re going to go mid-motor, I recommend the following:
One problem I was constantly having with my Slash 4x4 was blowing out diffs. The diffs were constantly leaking, and I think I rebuilt them 3 or 4 times. The diff rebuild kits are only $5, but the diffs are the most difficult and time consuming part to fix on the cars, so it was a pain in the butt.
A tip my friend Otto gave me was to buy new diff assemblies on ebay or amazon. They’re $15-20 and totally worth it to not have to take apart the diff, and they come from new cars so you know they’re good. Slash’s come with diff oil in the front and grease in the back, so you might end up with them switched (the diffs are the same, so you don’t know what you’re getting unless you open them up), but at my level it doesn’t matter.
I also found that one of my wheel bearings was crunchy, so I think that was the cause of some of the leaky diffs.
But I think I finally found the real cause of my leaky diffs – one of the things you sometimes end up with, is the car on its side. Basically if you go off a jump or roll or something, the car will end up on its side, basically lying on the side of two wheels. To get out of this, I would just turn the wheels and hit the throttle full backwards, and this would get my car back on its feet. But I’ve read this is REALLY hard on your diffs since one wheel is at full blast and the other is stuck on the ground. So don’t do this guys, just go down there and flip your car over or wait for another car to push it back on its feet.
My tip for the day.