There’s no doubt that in the USA, the two main competitors when it comes to race-level RC cars is Team Associated (AE) and TLR. Go to any major race in the U.S., and drivers for these two brands will be at the top duking it out to stand atop the podium.
Having owned a couple of AE cars (B5 and B5M lite) and TLR cars (22SCT 2.0 and 22T 2.0), there are definitely some different design philosophies at play here that reflect each company’s character. I thought I’d go over the main differences you’ll find when you purchase one of the two competitor’s kits, and overall who I feel has the advantage in each category.
Manuals: I find the Associated manuals a little more accurate with fewer mistakes, but the TLR manuals tend to be a little more like technical books with nice CAD drawings. I like the fact that AE manuals are English specific and have additional tips and tuning suggestions, while the TLR manuals are language-free and uses symbols which is less readable for Americans.
Advantage: AE
Plastics: The AE plastics feel like they contain more fiber content and usually beefier than their TLR counterparts. AE plastics also have a softer feel to them, although they are quite firm. TLR plastics feel like they have a harder shell with a softer core almost. Both plastics are fine, but I like the feel of the AE plastics better and I feel like the screws thread into them a little better.
Advantage: AE
Metals:
I find the TLR metals parts to be of very high quality. The anodizing is really clear and even, the metals are sturdy, even the ballstud spacers are amazing. AE metals aren’t bad, but seem a half step down from TLR parts.
Advantage: TLR
Design: There’s no doubt that the AE line of cars are very elegant and are put together with fewer parts. The 22 2.0 line of cars are a little more fiddly, like someone grabbed a bunch of LEGO bricks together and slapped them together, but this may be in part due to having a convertible rear and mid-motor platform. The steering bellcranks in particular are horribly fiddly. TLR cars also tend to be very adjustable, and they like to use shims to angle and adjust kickup, anti-squat, etc. Whereas AE tends to use inserts and different parts to make adjustments.
Advantage: AE
Shocks: TLR makes hands-down top-shelf shocks. There is no comparison. The pistons are machined, the caps are machined aluminum, the bleeder screws use copper seals, they are awesome. The fit and finish is amazing and the final product is super-smooth and doesn’t leak.
AE shocks feel more like a mass-produced budget shock and usually need some upgrades to get them halfway decent (V2 pistons/shafts, X-rings).
Advantage: TLR
Tunability:
Nearly all TLR parts are interchangeable across all of their platforms, and as such there is a plethora of factory tuning parts available. You can get parts in plastic, brass, aluminum, titanium, etc., different height ballstuds, different width hexes. In fact, there are usually so many interchangeable parts, it’s easy to get confused on what part is actually kit and what setting the kit is at!
On the other hand, the aftermarket is usually more limited for TLR cars and for the AE kits this is one of their strengths. So I would say factory parts the advantage goes to TLR, and aftermarket parts the advantage goes to AE.
This is the proper way to set up your steering. It’s important to follow the steps in order so that you have even throw left/right, and getting full throw as well as the proper steering curve.
1. Set trims on radio to 0.
2. Set steering EPA to 0 and steering Dual-rates to 100%.
3. Set your steering links to the same length. I use a set of calipers to make sure they are exactly the same length. This is important so that you get equal throw left and right.
4. Aim your bellcranks so they point straight ahead and attach horn to servo (at neutral) as close to 90 degrees as possible from the linkage it attaches to. On some cars, this is not straight up and down on the servo, the recommended angle may be less than that. For example the Slash 4x4 LCG wants your servo set one tooth to the right of 90 degrees. The manual may tell you what length the linkage is supposed to be. It’s important the linkage is the right length.
5. Attach linkage/bellcranks to your servo horn. Now everything is hooked up.
6. Adjust trim so that car drives straight forward. Don’t worry if they toe-in or toe-out at this point, you can adjust this later. The main thing is to adjust the trim so that the car drives in a straight line.
7. Set your toe-in/toe-out to 0 degrees (or whatever setting you want).
8. Set EPA (or dual-rate) so that nothing hits.
At this point, it’s possible that your left and right throw is different. If you are able to set the End Point Adjustment much higher on one side than the other, it means your steering link that connects the horn to the bellcranks is not the right length. You will have to shorten or lengthen it and then re-adjust your sub-trim/trim to re-center the car to drive straight. Start again at step 4 and go through the rest of the process again.
The current layout is narrow, tight, has U-turns into immediate jumps and short jumps into immediate U-turns. It also features a long straightaway where you pin the throttle for a few seconds. The layout is quite technical and challenging, and especially so for setup.
I found the optimal settings for my buggy is using low timing (to get strong acceleration and braking out of slow U-turns into jumps) and medium-tall gearing. On my B5M, I’m running only 10 degrees of timing, but with a 32/69 pinon/spur combo. This lets me get strong drive out of the turns AND a reasonable top speed. Kind of a weird combo, but it’s working well for me so far and the motor is staying cool.
Oct. 17, 2016 update: I have a newer review comparing the Futaba 3PV, Sanwa MX-V and Flysky GT3C. Check it out to see a comparison of the latest $100 transmitters!
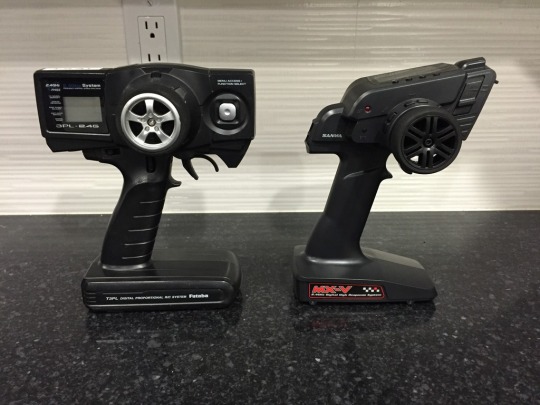
I needed a radio to replace my broken Traxxas TQi, and decided to get a Sanwa MX-V. I’ve had the Futaba 3PL for over a year, and also own a Sanwa MT-4S (a fabulous radio). I thought it’d be a good time to try out another entry-level model and since I’m a big fan of the MT-4S, I was curious to see how the MX-V would fare.
With the two radios in my possession, I decided this would be a good time to do a comparison. The other main radio in this market segment is the Spektrum DX4C. Unfortunately I won’t be purchasing or including one in this comparison. Sorry.
The primary market for this type of radio is bashing and entry-level racing. Or as an upgrade to the cheap radios that come with an RTR. Both radios are 3-channel fully digital 2.4Ghz radios and come with a receiver to get you started. They use variations of the FHSS standard. They also both run on 4 AA batteries with no option for a battery pack, although you could easily modify them to accept one.
For the review, I broke down the comparison into different categories with my opinion on the better product in each category. Let’s get on with it!
Price:
The Futaba 3PL retails for $115 and the Sanwa $120, but street price is about $100 for both and oftentimes less with coupons. This is pretty typical pricing for radios in this range, the Spektrum DX4C retails for a bit more but comes with AVC and 4 channel control. I think I ended up getting the 3PL for $85 shipped from Tower, and the MX-V for $86 shipped from Amain. So they are definitely in the affordable range if you look for coupons and sales. Advantage: tie
Design:
Let’s face it – the Futaba is ugly. It’s shaped like a brick and looks like something Conan (the Barbarian, not the late-night host) would wield on the driver’s stand. While style is not the most important thing when it comes to radios, the MX-V is far more modern and expensive-looking than the Futaba. On the plus side, the Futaba has a pretty sturdy shape and is probably more resistant to drops and getting jostled around in your tools bag. But I have to give the design nod to the Sanwa, it’s just a nicer looking radio. Advantage: Sanwa MX-V
Controls:
The wheel of the MX-V is rather small, it’s about the size of a Traxxas radio and seems like it was meant to fit kids’ hands in addition to adults. The 3PL wheel is larger and I prefer the bigger size. There is definitely a lot longer throw to the 3PL – the MX-V has very little wheel travel. But I do feel the MX-V has a much tighter steering wheel with less play/slop.. This may be due to it being new whereas the 3PL is about a year old and has definitely seen its share of use and abuse. But it is pretty noticeable.
For the trigger, the 3PL has a much lighter spring – the Sanwa is quite stiff, although the trigger fits closer to your hand.
Both radios will fit adult and kids hands reasonably well, but if you have big hands you will probably want the Futaba. If your radio is meant for a kid or you have small hands, the Sanwa will fit you better.
I couldn’t notice any difference in response times from the controls
themselves. Both are slower than my Sanwa MT-4S, but are certainly
reasonable and will work fine for most drivers.
I’m going to give the pick to the Sanwa for the smoother feeling wheel. Both triggers are quite smooth, but the Sanwa wheel is definitely sharper and more accurate. I will have to review this again in a year when the Sanwa has broken in, it will be interesting to see if the wheel gets sloppier over time. Advantage: Sanwa MX-V
Construction:
The plastics quality seems equal. The MX-V might be slightly smoother and cleaner,
but the Futaba feels sturdier. Neither are at the level of the high-end
radios, but both are fine.
The Futaba is heavier, at 387g vs. 333g of
the Sanwa. If weight is an issue, I’d go with the MX-V, but if you want a sturdier radio, I’d go with the Futaba. The Futaba’s screen
is a little better protected and less likely to get damaged than
the Sanwa. Advantage: tie
Features:
Both radios have the standard adjustments: trim, EPA, dual rate, as well as 10-model memory and ABS. The MX-V has sub-trim adjustment and expo, while the 3PL does not, but the 3PL has 4 wheel mixing and a 4th on/off channel.
For racers, expo is pretty much a must. For bashing or crawling, the 3PL features could be useful. I’m going to give this category a push, depending on whether you are racing or bashing. Advantage: tie
Menu System/Display:
The Futaba has a large LCD display that cycles through the various adjustments every time you press the function button. Until you get used to it, it’s hard to know how many times to press it to get back to the battery display or model select.
The Sanwa menu is always present on the LCD screen, but the letters are a little smaller. I like the Sanwa menu better because it’s easier to navigate. You can tell how many times to press the button to get to the option you want to change. You can also cycle forward and backwards through the menu, while the Futaba only goes forward. If you accidentally go too far, you have to cycle through the whole menu again to get back to where you were. It’s not a deal-breaker, but it is annoying. Neither display is backlit.
The MX-V also has a small red LED that lights when the radio is on, while the Futaba has no indication other than the LCD display. Advantage: Sanwa MX-V
Receivers:
The Sanwa comes with a waterproof
(albeit bulkier) receiver, and the Futaba comes with a pretty nice 4
channel receiver that is a little slimmer and cleaner.
But
the real difference comes when you need to buy additional receivers:
Sanwa starts at $50 and goes up to the astronomical $140+ range,
while a very nice wireless Futaba 204GF-E can be picked up for $39.
Sanwa
receivers are by far the most expensive on the market and I don’t see
that changing anytime soon. Futaba receivers aren’t cheap, but they are
reasonably priced and come in a variety of sizes and features. While
the radios are similar in price, if you’re on a budget, the Futaba
receivers will save you a LOT of money down the road. The Futaba wins in this category, and it’s not even close. If you are price conscious or plan to get lots of receivers, the Futaba has a huge advantage. Advantage: Futaba 3PL
Conclusion:
At the end of the day, I think the decision is going to matter more on whether you’re bashing or racing with the radio. The feature sets are close, with the Sanwa geared more towards racing functions and the Futaba towards bashing functions. Performance of both radios is similar. The 3PL has been around since 2010, and it’s starting to show its age. The MX-V came out in 2013 and it shares its DNA with the more modern MT-4 and M12.
If you only bash, my choice is the Futaba 3PL because of its sturdier construction, MUCH cheaper receivers, and the additional 4th channel for accessories. The controls aren’t quite as good, but for bashing you’re not going to notice.
If you race or drive on a track, I would go with the Sanwa MX-V. It’s smaller, lighter, sleeker, and the controls are more precise. You also have expo control which is useful on high-speed sections.
Overall, I have to give the edge to the MX-V. I am more of a racer, and precision and feel are very important to me as well as the expo function. If I had to keep only one radio I would definitely keep the Sanwa, but the Futaba is certainly a solid radio also. My pick: Sanwa MX-V
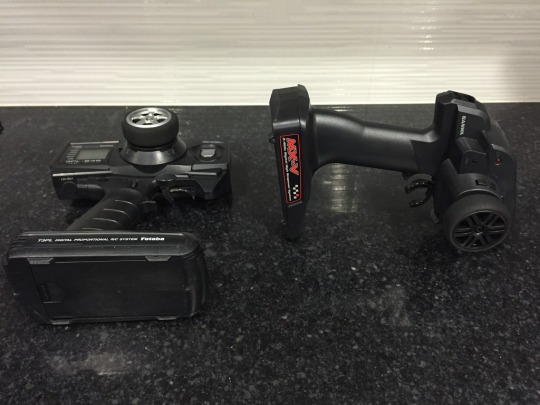
One additional note of weirdness – both radios have an alternate resting position, which is flat on the back of the Futaba, and nose-down faceplant for the Sanwa. I’m not kidding, they have little feet to let you set your radio down like this.
I don’t know anyone that actually does this, but for purposes of completeness, I thought I’d share a picture!