I threw some slicks on the back of my Hornet and took it to the local track to see what it could do just for the heck of it.
Initial thoughts:
The stock motor is slow, but decent enough for the Hornet. There were only two small jumps I could make, the rest I had to roll over.
High traction is not its friend. The Hornet is tall and narrow, and traction rolls easily. It works better in low traction.
Stock springs are too stiff. Damping is probably OK, but the front springs are way too stiff. Rear springs are too stiff with the preload spacer, definitely take those off. A lot of people say the springs are too soft and that’s why it’s bouncy, but actually the opposite is true: the springs are too stiff.
Ride height is too tall. The buggy is very light, especially in the front, and with stiff springs it sits all the way up all the time.
Braking is OK with the stock ESC and there is tons of weight on the rear, so the rear end doesn’t break loose, but with the very light diff action the steering can get pretty squirrelly.
I’m going to work on suspension a little bit, softening the springs and running a lower ride height should help.
Monday, July 25, 2016
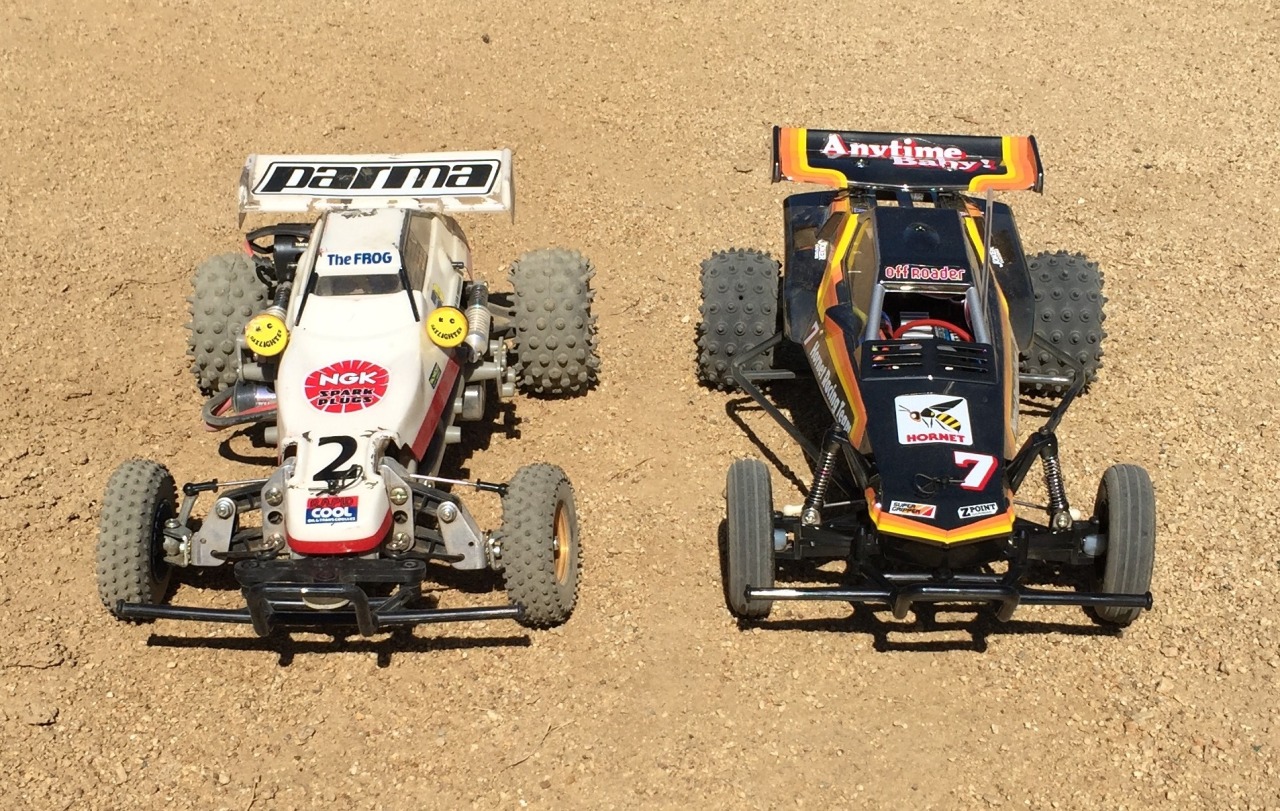
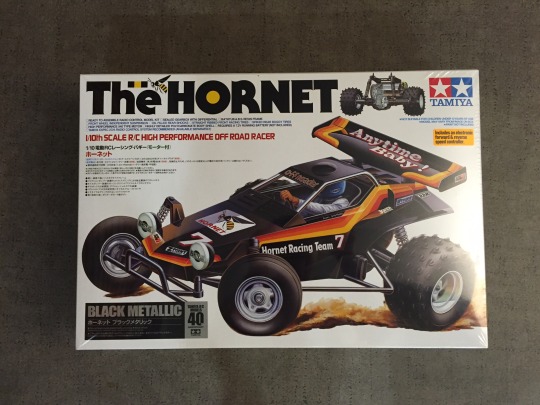
Tamiya Frog (1983) vs. Tamiya Hornet (2016)
This is my neighbor’s original Frog from back in the day and my re-release Hornet. The Frog’s been upgraded to an ESC, modern Hitec servo and an RS540 Sport Tuned motor on Nimh. My Hornet is box stock with a Traxxas servo running on 2S Lipo.
The Hornet is faster, must be the battery!
This is my first Tamiya. I always wanted a Grasshopper or Frog when I was kid, but never got one, so I missed out on the whole Tamiya RC craze of the 80′s. Fast-forward 30 years with kids of my own and a slight modernization of a classic, and here we are.
I picked up a Tamiya Hornet re-release as a summer project for the kids. Well, they ended up only building about 25% of it and I built the rest, but at least they can read directions and know how to snip parts off trees and such. I picked the Hornet over the other classic early Tamiya buggies because
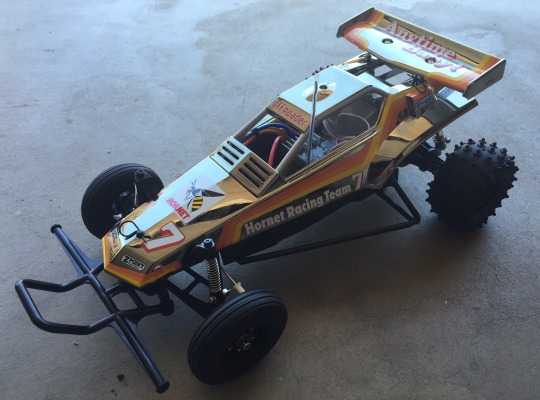
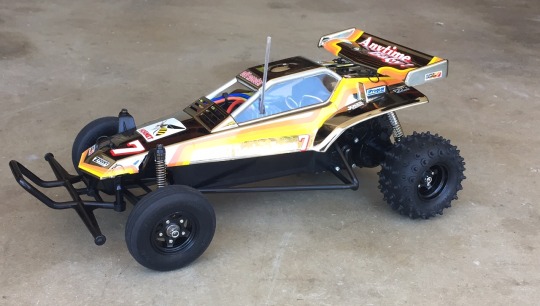
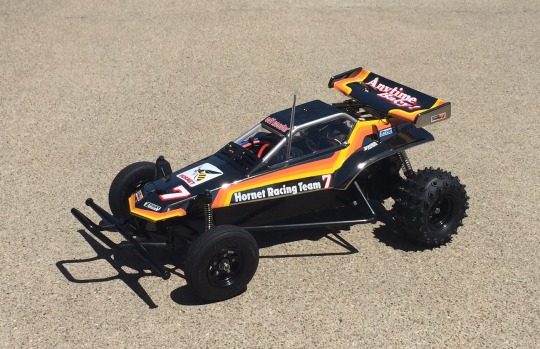
it had a few of the features I was looking for in an RC kit for my kids – bathtub body, a robust transmission, and economically priced. Looking at the different versions, I decided on the 40th anniversary Black Metallic edition, because it had a few upgrades that were worth it (brushless ESC, black wheels) and came in this unusual pre-painted black metallic color.
The paint is basically a black chrome color and looks a little bit different, depending on the lighting. It’s kind of a pale gold color, but can look silvery-titanium or black, depending on the lighting.
In the shade it looks a titanium-gold color.
In bright sunlight or in low-light it looks black.
I wasn’t too sure of the color, because it looks gray online, but it actually looks pretty nice stickered up. Definitely a neat color. Overview:
Tamiya has re-released most of their classic RC cars, and the Hornet was one of their best sellers. It’s essentially a Grasshopper with some upgrades, namely a hotter motor, lightweight Lexan body and better rear shocks. With the re-release, you get an ESC and some minor chassis and body changes, but they are pretty close to the original versions. Build: 5
The build was mostly straightforward. Tamiya has a bit of a confusing parts layout, I ended up dumping everything in a Tupperware container and pulling parts as I needed them. The plastics are on the soft side, and you have wood screws tapping into plastic, so not the most robust design, but it works. For whatever reason, I didn’t find the instructions quite as straightforward as TLR or Associated instructions – they have a confusing parts tree identification system, and some of the metal spacers were nearly identical in size and shape, so it was hard to tell them apart. They do include a nice 1:1 key for parts, so that was nice in trying to match screws to the ones in the diagrams.
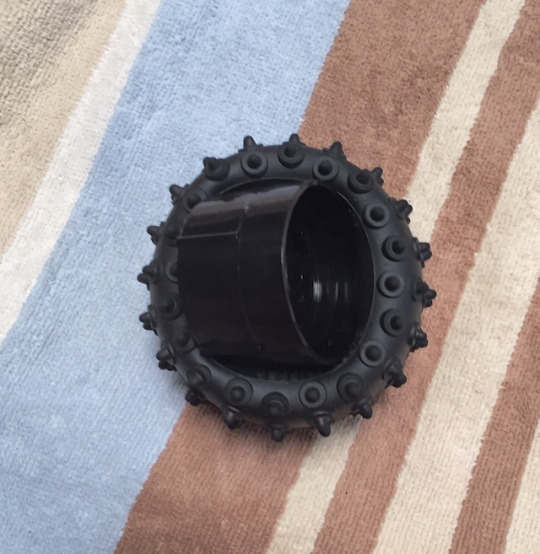
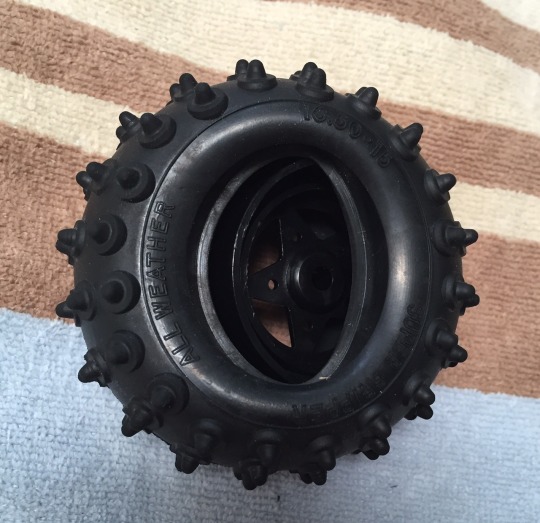
The only part that was really difficult was the rear tires. They are a 3-piece design, where you have to put a fairly big center hub into the middle of the tire that has a much smaller hole. There’s no way a kid could do this. See my tips section below for some suggestions on making this go more smoothly.
The stickers will affix to a plain black body, but the decals aren’t pre-cut. It took me about an hour to affix the decals. Performance: 3
This is not a performance buggy. I’m not sure it was state-of-the-art back in 1984 either. As near as I can tell, the Brat/Frog came out first with independent suspension and a space frame, and then Tamiya decided to come out with a simpler and cheaper buggy – the Grasshopper. The Hornet is basically a higher-spec Grasshopper, but not by much.
The main area the buggy lacks is in the suspension department. Up front, you have very narrowly set front arms with friction dampers and no camber adjustment. The friction dampers are basically shocks with a metal shaft sliding through greased O-rings. Stiction is terrible with the O-rings, the springs are way toostiff, and you get dirt all over the dampers which binds things up more.
The rear, surprisingly, is even worse. You have a live axle with transmission and motor mounted as a one-piece unit in some sort of sliding pivot system. The Hornet has oil-filled dampers, but the front of the rear assembly is not fixed, so the whole rear end ends up bouncing around.
On a smooth surface, the suspension is adequate, but on any sort of bumpy surface, fugghedaboutit. In short grass, the buggy was knocked around a lot and had a tendency to flip. Drive this on pavement or smooth dirt.
On the plus side, the soft, air filled balloon of a rear tire actually provided pretty good traction in the baseball diamond I was running at. The front ribbed tires also stuck pretty well. I think the rear tires are so soft, they actually make up for some of the suspension issues.
The electronics also worked well – the ESC works with a brushed or brushless motor, and the Mabuchi 540SH motor is fine for a solid amount of speed. It’s not fast, but more than adequate for the type of car it is.
Drive this buggy for fun, and reminisce about the 80′s while you’re doing it. Durability: 5
I didn’t crash my buggy much, just hit the side of the backstop a couple of times and flipped it a few times, and nothing broke. If you drive this buggy in the environment in which its intended (an open dirt field, baseball diamonds, etc.), it should be fine. The steering tiedrods are laughably weak (basically thin wire) and the plastics seem a bit soft, but parts are cheap and it’s known for being relatively durable, so it should be OK.
The transmission is all plastic, but the gears are quite beefy. I’m not sure it would hold up to much more than a brushless 21.5t or 17.5t motor, but it ran fine on my 2 cell Lipo with the stock brushed motor. Value: 10
This buggy is pretty darn inexpensive. I got mine for $115 shipped from Tower, and that included an ESC, brushed motor, wheels and tires! I used a leftover plastic Traxxas receiver from a Stampede 4x4 and a Sanwa receiver, and it was good to go. You can’t get that kind of value nowadays! I don’t think the price has changed in 30 years, despite inflation, and that is pretty
remarkable. Support: 7
This buggy has been around for a long time, and Tamiya seems to still support the re-releases, so parts are still available. I’m not sure that will always be the case, but it’s one of the longest running RC cars out.
There aren’t a whole lot of upgrades still available, but I was able to get a hex conversion for the rear tires. The main issue with support is that there aren’t a lot of aftermarket wheels and tires designed to
work for this buggy, so some work is involved if you want choices in rubber.
Not a lot of online or local stores carry Tamiya parts, but you should be able to order parts from Tamiya USA directly.
Dislikes:
Overall I like the buggy a lot. I don’t bash much, so I’m not sure this buggy will see much
action, but I enjoyed the build and the nostalgia factor. The stuff I didn’t like was the rear tire build, but if you take the buggy for what it is (a trip down memory lane), it’s fun.
The handling is poor, and the steering radius is pretty limited. But this is a basic entry-level buggy from the 80′s. Conclusion:
The Hornet re-release is a great value and an easy build. Performance is still stuck in the 80′s, but if you’re looking for a cheap starter kit to relive your youth or something fun to build with the kids, I think the Hornet is a great choice. Drive the buggy as a basher in some smooth dirt, and you’ll have a great time.
If you’re looking for an inexpensive kit with better performance, the Tamiya Neo Buggy Fighter is a good choice. It’s an evolution on the Grasshopper/Hornet family, with better performance for about $100.
Build Tips:
Lipos
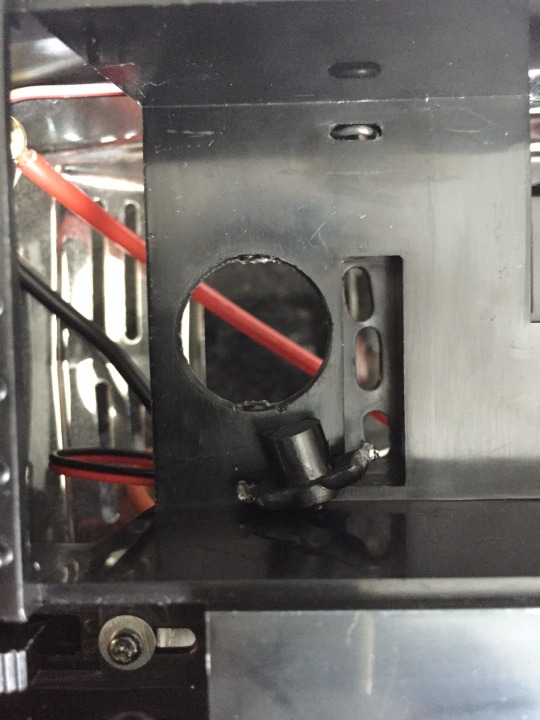
The Hornet will run on Lipos, but there is no low-voltage monitoring, so you’ll have to be careful to not let the battery run down too low. I got pretty good run-times (basically continuous full-throttle for 15 min.) on a 5000mah Lipo. A full-size stick pack won’t fit, but a shorty fits pretty nicely if you cut off the driver mount that sticks out into the battery tray. Trim out the piece in the circle below.
Rear tires:
Here is the technique that seemed to work best for me:
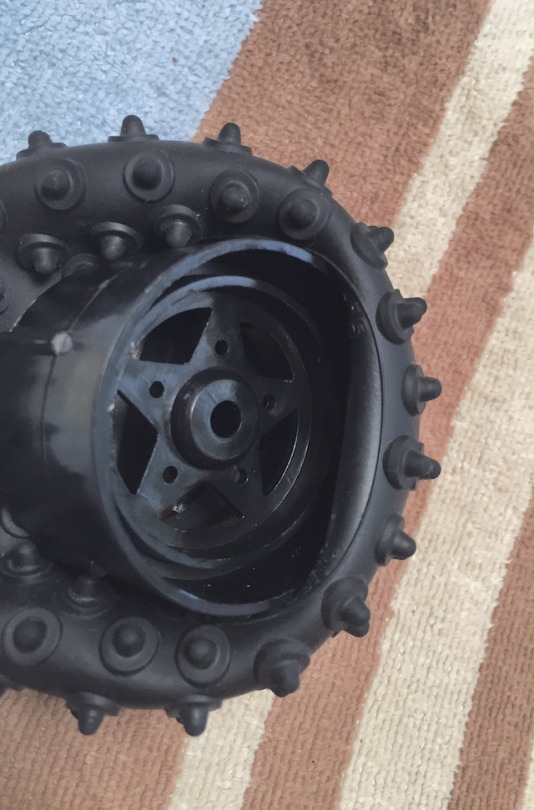
Start with the hub sideways and push it in as far as it will go.
Work one side of it in, and try to get the lip of the tire over the lip of the wheel. I went on the raised edge, but in retrospect the other lip of the wheel (fliping the whole wheel around) would have been easier.
Continue around working the lip of the tire over the lip of the wheel. Don’t worry about the far side of the tire, even if it starts inverting.
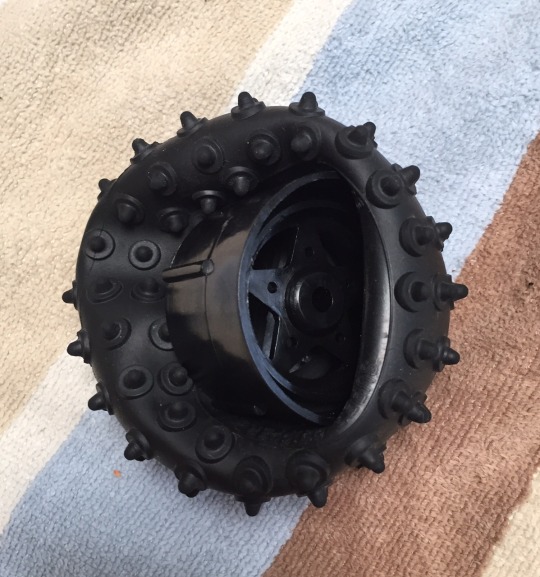
Get the entire wheel into the cavity of one side of the tire, and you’re basically done. Now have a beer and take a break and rest those fingers!
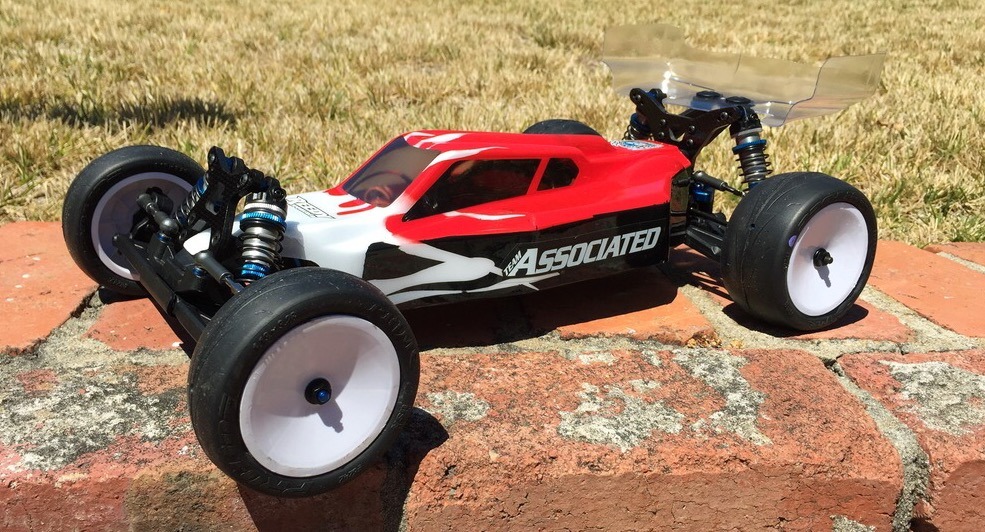
I have the car built and was able to put in a few sessions with the car. I had some electronics issues that I think I’ve sorted out, but I got enough time in to gather some initial thoughts.
Is it worth it?
Yes! It’s a great car, has even more adjustments than the B5, and is more versatile. It’s also lighter out of the box, by about 20 grams over the B5M Factory Lite.
Which one should I get, the B6 or B6D?
I run on mid-high traction indoor clay. When the track is perfect, it’s high traction clay where slicks are a must. Even in these high traction conditions, I recommend getting the B6D and feel the B6 is only going to be wanted on carpet/astroturf. I bought a B6, and ran kit setup on high traction, and it was completely wrong for the indoor clay. I’ve converted the car to basically a B6D with laydown, and it’s starting to get very good. The kit setup is very close.
Any tips?
Put some loctite on the battery strap nuts, they are tiny and easy to lose and don’t have that many threads to secure.
Use shorter screws on the wing button mount, you’re going to be taking that thing on and off a LOT.
For the B6, there are a couple of errors in the manual – the main one is that you use M3x14mm screws on the top of the transmission mount to screw into the camber block, not M3x8mm. When in doubt, consult the B6D manual, it’s more accurate.
The body needs to be trimmed in the midsection a little more than the cut lines – the chassis bends up in the middle, so the body will be shorter there.
Overview:
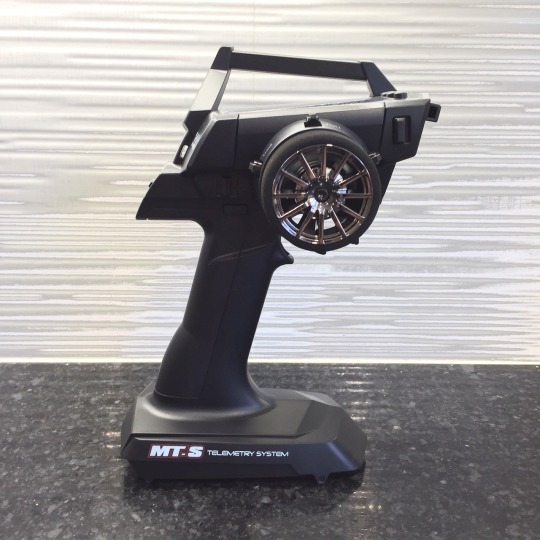
I needed a couple of small Sanwa receivers and found a screaming deal on an MT-S with two RX-482 receivers. These are the tiny, wireless receivers that normally cost about $100 each. Banzaihobby (in Japan) was having a sale for an MT-S with two of the receivers for $168. With the strong US dollar, there are some amazing deals on gear from overseas. Considering the radio costs $240 with one receiver in the US, it was essentially half off. So although I didn’t really need another receiver, it was sort of a freebie.
I’m a big fan of Sanwa radios, and this is their newest entry into the market. The MT-S is basically their new mid-range 4-channel radio, but it has some nice improvements over their old radio, the MT-4.
Retail price: $240
Features: 9
The MT-S has a host of features, targeting a wide audience. It has the full complement of normal adjustments (EPA, dual-rate, expo, trim, sub-trim) that you would expect from a modern radio, 20 model memory, and an internal antenna, as well as some more advanced features you usually see on higher-end radios.
It also has a backlit dot-matrix display, supports telemetry (either from the special Sanwa telemetry receivers, or the RX-462 with external sensors), has adjustable trigger and steering tensions, and a lap timer.
For the bashers and crawlers, it also features a variety of 4WD modes (mixing, 4WS, etc.). I don’t own a basher or crawler, but the list seems pretty comprehensive and I have no doubt it would fulfill any 4-wheel requirement. It has switches for a 3rd and 4th channel.
The feature list is almost exactly the same as my MT-4S (a slightly higher spec radio), but I did notice slight disadvantages feature for feature: for example, the telemetry on my MT-4S has an analog RPM display and voltage to the 100ths (example 7.67v instead of 7.6v). The link disconnect beeps immediately on my MT-4S, while the MT-S has an inactivity timer. Little things that don’t matter much, but they show where the MT-S saved a few bucks over the MT-4S.
I tested out the telemetry, using an RX-462 and external temp and battery voltage sensors. It’s pretty damn nice to be able to see your voltage and temps in real time, and I plan to use this on all of my future RC cars. Be aware that the RX-462 (at the time of this post) is the only receiver that lets you use any brand ESC. The rest of the receivers require a special Sanwa ESC (example: Super Vortex) to use telemetry.
Sanwa uses 4 different frequency protocols for their radios (FHSS, FHSS-2, FHSS-3, FHSS-4/T). The MT-S only supports FHSS-3 and FHSS-4/T which are the ones used by the higher-end and newer receivers. If you have lower spec FHSS or FHSS-2 receivers, they will not work! Some of the higher end Sanwas support all 4 frequencies.
Design: 7
The MT-S design is quite similar to the MT-4/MT-4S and fits most of the 4-series radio cases/foams. It’s a little uglier – the angles of the antenna are weird, but it is still a modern, fairly expensive looking radio. It has a nice, big dot-matrix display that is easy to read, uses blue LEDs like the big boys, and the plastics look very similar. Overall, a nice design that is inline with the other high-end Sanwa radios. The radio is slightly lighter than the more expensive Sanwa radios, which is nice.
It doesn’t have any dials or thumbwheels, everything is laid out with buttons which I actually like better than the MT-4S.
The MT-S runs on either 4 AA batteries, or it has a connector to use a LiPo or LiFe battery. I use a Protek 1600mah LiFe battery, and there is plenty of room to spare.
Controls: 8
The MT-S wheel and trigger feel exactly the same as the MT-4/MT-4S. The ergonomics are identical. Honestly, besides the weight, this radio is indistinguishable from the 4S when I’m holding it in my hand and driving. The only difference is the higher end radios have an adjustable grip with a thick and thin handle. This one is stuck with the thin handle which could be a bit of an inconvenience if you have large hands. For me it’s perfect though. It doesn’t have that rubbery, grippy handle like the big boys – it’s smooth plastic, but this is a pretty minor difference.
The trigger and steering wheel are very smooth and precise. The adjustable tension is nice and allows you to get just the right amount of resistance. It has a non-linear spring (more you turn the wheel, the stiffer it feels), which is typical of Sanwa. My MT-4S did develop slop over time, so there is a good chance the MT-S will also, if you’re like me and ham-fisted with the controls.
Performance seemed just as fast as my MT-4S. I couldn’t tell a difference, but it does seem faster than the lower spec MX-V. For anyone but world-class racers, I think the speed and performance and controls will be more than sufficient. This radio isn’t going to hold you back.
Price: 3
At $240, this is not a cheap radio, but is about par for a mid-range radio. If you can find a deal from banzaihobby or elsewhere, at $168 with two receivers this is an amazing transmitter for the price and would be a solid 10 rating.
Be aware that while the radio is not that expensive, the receivers are very costly. At the time of this post, the cheapest FHSS-3 or FHSS-4 receiver is $100! I’m taking that into consideration and have to give it a below average score as a result. The radio itself is not overly expensive, but the price of the high-end receivers really hurts it.
Conclusion: 8
The Sanwa MT-S has all of the features and performance most people are ever going to need. It’s $60 less than the MT-4S and I think will meet the needs of 99% of the people out there. You can’t get as crazy with the throttle curves, there’s no programmable “slam” button on the back, and there are little nuances here and there that separate the very highest radios from this one. But with telemetry and very good performance latency, this is a pretty damn good radio for most everyone. It does everything you could want.
If you are able to get this radio from Japan or elsewhere for a low price, especially with multiple receivers, it’s a no-brainer. You won’t be disappointed.
My main hesitation with regards to purchasing one is that it does not support the older FHSS/FHSS-2 frequencies. The newer receivers are very expensive. If you have basic Sanwa receivers you’d like it to work with, or if you are price-sensitive and need a lot of receivers, spending a little more on the MT-4S would actually save you money in the long run by letting you buy the cheaper receivers.
Overall, still highly recommended. It’s a mid-level radio that has most of the features of the high-end radios.
Helpful tip:
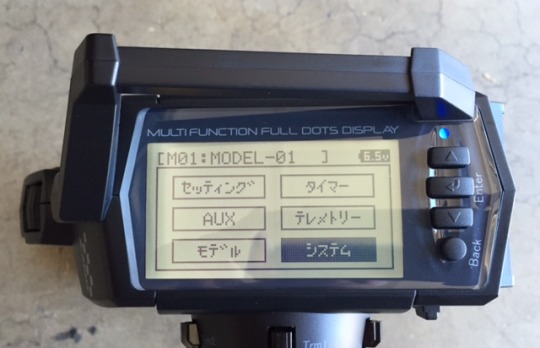
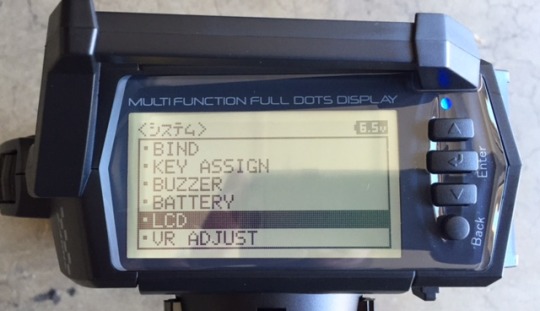
My MT-S from Japan came setup in the Japanese language. To change it:
turn on the radio
press ENTER to get into the menu system
select the last option
select LCD
you should see a choice for language, change it to ENG
Been pretty busy RC-wise lately. In the middle of the Hornet build, I picked up a B6 and spent a few days getting that car together. All done and ready to roll, hopefully I can get a review up in the next couple of weeks.
Wednesday, July 13, 2016
I’ve finally got a setup I’m pretty happy with. It’s heavily based on Frank Root’s Indoor Nationals setup, with some changes for a little more corner entry steering and mid-corner body roll.
I recently switched my TLR 22T 2.0 from Jconcepts Smoothies to Pro-line Primes, and the truck works so much better and I have tons more traction. I think the main problem with the Smoothies is that the Dirtech foams are way too big for the tires, and so they end up being too firm.
If you use Dirtech foams, I highly recommend you cut off the inner ribs flush with the foams.