Wednesday, September 28, 2016

Entry-level RC radio comparison review: Sanwa MX-V vs. Flysky FS-GT3Cvs. Futaba 3PV/T3PV


image

Here it is!  We are proud to bring to you the ultimate radio comparison of 3 of the top 4 entry-level transmitters on the market today

We were able to pull together:
  • Sanwa MX-V
  • Flysky FS-GT3C
  • Futaba 3PV/T3PV
We also contacted Horizon Hobby to see if they were interested in providing a Spektrum DX4C, but unfortunately they didn’t get back to us.  It would have been nice to include that in the comparison, but no matter, the show must go on!


Overview:

This comparison focuses on the entry-level class, which is a step above your regular RTR radios.  What you get in this category is LiPo battery compatibility, drop down wheels, LCD display with menus, all the steering and throttle adjustments (EPA, dual-rate, expo, trim, servo reversing), model memory, foam wheels, and ABS.  Some of the radios have additional functions.

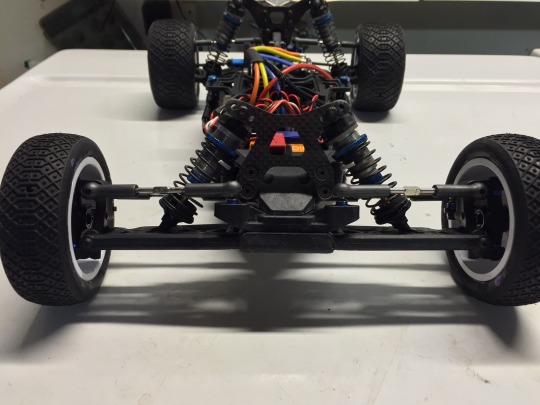
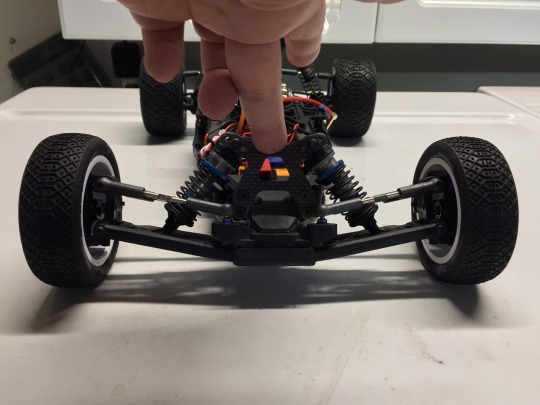
For the test, we ran all 3 transmitters in the same vehicle, a track-prepped Traxxas Slash 4x4 Platinum edition, on an indoor clay track back-to-back-to-back.  The Slash 4x4 is not the most precise vehicle, but my co-tester Alex drives one as his usual track car, and is very in tune with how the truck handles.  We think it represents a vehicle both bashers and entry-level racers use and fits the archetype of the target market. 

I’ll rank the radios in several different categories based on which I think is the best/second/third in that category and my thoughts on each.

Features:
  1. Futaba 3PV
  2. Flysky GT3C, Sanwa MX-V (tie)

All 3 of these radios are very similar in feature.  They have the different adjustments listed above, but the Futaba stands out with some bonus features.  The big one is obviously receiver/battery voltage telemetry (with compatible receivers and sensors), but it also has 4-wheel steering/mixing using a 4th channel. 
The FS-GT3C and MX-V are essentially identical in terms of features.  There’s nothing special about them, but more importantly, there’s nothing they’re missing.  You’re going to be able to do everything you need to do with these radios.

Design:
  1. Futaba 3PV
  2. Flysky GT3C
  3. Sanwa MX-V
The MX-V is starting to look a bit dated, with its small screen, chunky body, and dark gray body.  The FS-GT3C has a sleek, and very flat body with a large display.  It has a folding antenna, which is rather antiquated compared to the integrated antennae of the other two, but it doesn’t look out of place and seems reasonably stout.  But the real winner here is the 3PV – it’s a miniature version of the high-end Futaba 4PX with clean, crisp lines, and an elegant, svelte body.  While simple and unassuming, it quietly wins the design category.

Controls:
I’ve decided to break this category down into 3 areas, because each radio has strengths and weaknesses in different areas.  If I had to pick one radio as the frontrunner, it would probably be the MX-V, not because I feel it has particularly good controls, but because it’s not particularly bad in any one area (except for the stiff wheel!).

Steering Wheel
  1. Futaba 3PV
  2. Sanwa MX-V
  3. Flysky GT3C
The 3PV has a very nice, high density foam wheel with a light (but not too light) spring that is very linear.  The MX-V has a ridiculously stiff (and it gets progressively stiffer!) steering wheel, but it has zero slop in it and is very precise. 
The GT3C has a sloppy wheel, there is no way around it.  It also has a non-linear turn, basically feeling like it has a bunch of expo dialed in (maybe 15-20%).  This took some getting used to, and I felt more comfortable turning down the expo to match the linearity of the other radios.  The wheel spring in our example also broke after a couple of months and had to be jury-rigged, so that’s not a good sign.  We were able to repair it, but with a lighter spring feel.
Overall, the 3PV wheel is pretty much perfect, while the MX-V is too stiff and the GT3C is too sloppy.

Trigger
  1. Sanwa MX-V
  2. Flysky GT3C
  3. Futaba 3PV
The MX-V trigger has a short throw and is a bit too firm, but it is precise and more importantly has a fairly short brake throw.  This is important to me because I have short fingers, and I could never get comfortable with the long throw of the 3PV.  The Futaba is bad enough that I have to partially shift my hand position to get full extension on the brake.
The GT3C actually has a non-linear trigger – the first 70% of travel does not equate 1:1 with 70% of throttle, it has a flat curve and then quickly arcs upward in the last 30% of travel.  With about 38% of expo, we were able to (mostly) fix it, but it’s something that you should be aware of.  But the trigger is pretty smooth without much play, and the brake is a comfortable distance.

Layout
  1. Flysky GT3C
  2. Sanwa MX-V
  3. Futaba 3PV
The GT3C has a fairly vertical handle which I like.  It also includes two rubber grips to adjust the size of the handle for different hands.  And, a little unusual in this class, it has a full drop-down wheel that makes the hand positions very comfortable.  The wheel sticks out a bit further from the controller than the other two.  It’s also the only controller of the group with a thumb switch for controlling channel 3 on/off and trim.  This is one area where the Flysky is head-and-shoulders above the others.
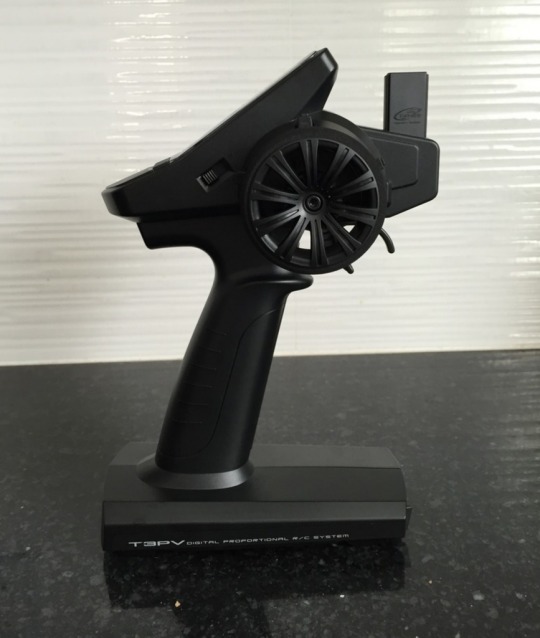
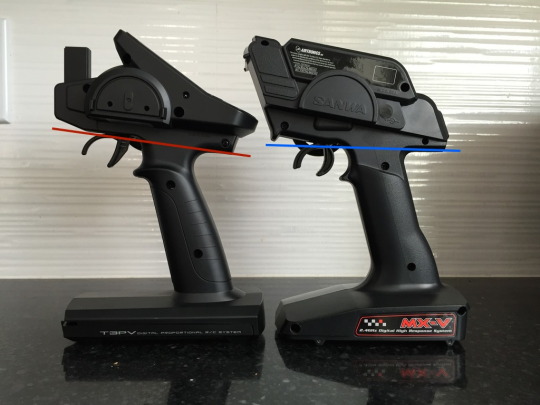
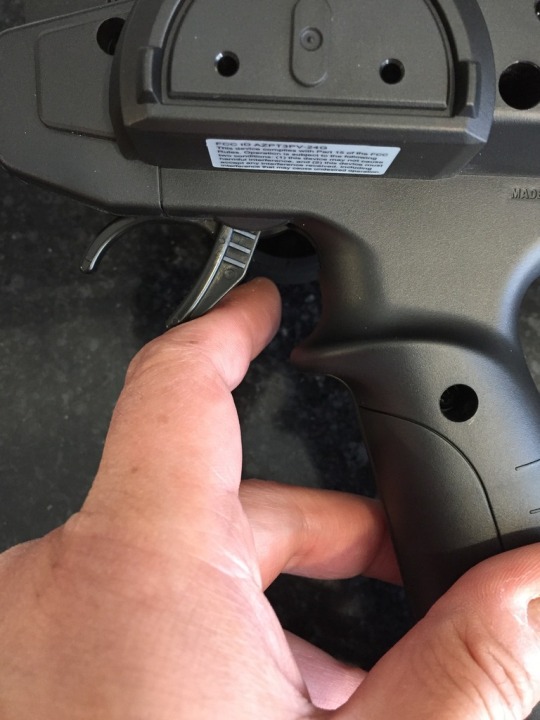
The 3PV has a very smooth, but badly angled grip so that your hand falls away from the radio.  Coupled with an upward sweep of the trigger, and you will want to have long fingers to properly use this radio.  See my 3PV review for more details and pictures on this issue.  It also has a partial drop-down wheel.
The MX-V is middle of the road.  The grip feels fairly ergonomic and has a textured plastic design, but it’s nothing particularly remarkable.  It also features a partial drop-down similar to the 3PV.

Construction:
  1. Sanwa MX-V
  2. Futaba 3PV
  3. Flysky GT3C
The MX-V is the tank of the group.  It’s bulky and the heaviest, but that heft and size makes it feel more durable than the other two.  I felt the GT3C was OK, but the build quality seems fairy questionable.  Fit and finish is a little behind the other two.  The 3PV is very light and feels small, but does not feel flimsy

For bashing, I would pick the MX-V for its durability (no, we did not drop test them, this is just a guess).  It’s a solid feeling radio.

In terms of weight, the GT3C is the featherweight of the group, coming in at 324g with battery.  The 3PV is slightly heavier at 344g, and the MX-V is the heavyweight of the group at 401g fully loaded.  Overall, this is a pretty light group of radios.

Performance:
  1. Futaba 3PV
  2. Sanwa MX-V
  3. Flysky GT3C
Performance is subjective, what I’m referring to here is how responsive and accurate the radio feels in controlling the car.

The 3PV feels the most responsive to me, with seemingly lower latency and a more in-tune feeling.  I ran it back to back with my MT-4S on my buggy and it felt very close.

The MX-V feels vague to me and I’m pretty sure it’s a little bit slower in response time.  The very stiff trigger and wheel also made it feel like you were always trying to put in a lot of action on the controls and it was a step down in terms of being “one with the car”.

The GT3C is not bad, but the sloppiness of the wheel and the not-quite linear feeling I got from the throttle/steering made it always feel like you were never 100% sure what was going to happen.
Now there is definitely some oddities with the GT3C on the electronics response front.  On the throttle, in the air, there’s almost a slight delay or maybe slow throttle lift-off when you release the trigger.  Those of you who own Slash 4x4′s know of its tendency to nose-down in jumps.  Well, with the MX-V and 3PV, this nose-down issue was there, but it completely disappeared with the GT3C!
 
It’s really strange – what I think is happening is that the GT3C will smoothly drop throttle down to 0 when you let go of the throttle, while the MX-V and 3PV will chop it straight to 0.  Kind of weird, and not what you would normally look for in a radio, but it worked remarkably well in smoothing out the attitude of the car.  So what this tells me is that the FlySky engineers designed in some non-standard traits into the radio:  there’s +expo on the steering to make it turn in more sharply and more quickly, and -expo on the throttle to make it slower/easier to control in the first half of the pull before it ramps up to full throttle.  And then there is some throttle smoothing going on so that the car is not so abrupt when transitioning from throttle to neutral to brake.  I did not like the +/- expo pre-dialed into the steering/throttle, but the throttle smoothing curves definitely made the Slash 4x4 much easier to jump and land.

Display:
  1. Flysky GT3C
  2. Futaba 3PV, Sanwa MX-V (tie)
The MX-V display is a little on the small side, but it works and is fairly easy to read.  The 3PV has a larger, squarish display with a very nice glossy finish, but the numbers and menu items are small.

The winner is the GT3C which has a very large display nearly the entire length and width of the top of the radio.  The display is huge, the numbers are huge – it’s very easy to read even if you have bad eyes in low light.  It’s also the only display of the group that is backlit.  A nice feature, especially if you race indoors.

Menu:
  1. Sanwa MX-V
  2. Futaba 3PV
  3. Flysky GT3C
Let’s get this out of the way – the GT3C menu sucks.  It’s terrible.  It makes no sense at all, and there are too many buttons.  Scrolling right made the menu go left.  There was also something weird going on with the memory of the various trims and EPAs, sometimes they seemed to transfer over to other models or get preset by accident and I still am not sure what was going on.  We were also unable to get the GT3C properly calibrated with the ESC on the Slash.  Throttle EPA and expo were set to default, forward or reverse didn’t help, it never was properly set up, so the Slash ESC did not like the signals it was getting.

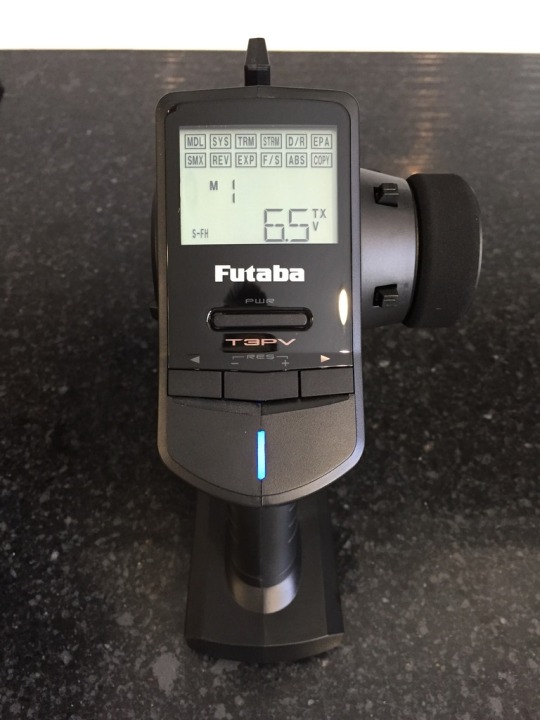
The MX-V menu is straightforward and has 17 menu items to scroll through while the 3PV has a whopping 27, which is far too many.

The 3PV button layout is simpler and more intuitive to go through the menu, but the sheer number of things you have to scroll through drop it to second place.

While there nothing magical about the MX-V, the menu system is simple and just works like it should.

Binding:
  1. Futaba 3PV
  2. Sanwa MX-V
  3. Flysky GT3C
Binding the 3PV is a cinch – you just turn it on and press the bind button.  Binding the MX-V is more involved, you have to turn on the car with the bind button held down and then turn on the radio with the bind button held down.  I did not bind the GT3C, but it uses a bind jumper plug, so it falls to last place.

Battery:
  1. Flysky GT3C
  2. Futaba 3PV
  3. Sanwa MX-V
The GT3C comes with a single cell 800mah LiPo that you charge with the included mini-USB cable.  Very nice!  It has no other choices for batteries, you can’t use AA or other battery types in the very small battery compartment, but I’m sure you could find replacement LiPos if necessary.

The 3PV comes with a socket for the standard Futaba (but of course) JST connector and a battery tray for 4 AA batteries.  We used a LiFe battery for this test which worked well, although some stick LiFe/LiPo batteries are a little tight.  It also has a charging plug if you want to use a Futaba NiMh battery.

The MX-V is hardwired for a 4AA battery tray, but I was able to modify it to use a JST connector with minimal effort.  With the modification, you can use the battery of your choice.

Manual:
  1. Futaba 3PV
  2. Sanwa MX-V
  3. Flysky GT3C
The 3PV manual is well laid out and printed on nice, glossy paper and is an excellent example of what a radio manual should look like.

The MX-V manual is fine too, printed on plain black and white.  It’s maybe a tad more confusing to read, but it’s still very good and I have no complaints.

The GT3C manual is just flat out terrible.  It’s bilingual in English and Chinese.  Maybe if you read Chinese it’s an awesome manual, but the English part is really bad and clearly written by someone who is not a native English speaker.

Price:
  1. Flysky GT3C
  2. Sanwa MX-V
  3. Futaba 3PV
The GT3C is the big winner here, and it has a huge advantage over the other two.  Street price is $50, which is lower than most RTR radios!  It’s about half the price of the MX-V ($99) and 3PV ($109).

If you are on a budget, the GT3C will save you quite a few dollars.

Receivers:
  1. Flysky GT3C
  2. Futaba 3PV
  3. Sanwa MX-V
The GT3C also has fairly small, light receivers for an astoundingly low price of about $6 on the street.  That’s just ridiculously cheap.

The Futaba receivers (you need FHSS/S-FHSS/T-FHSS ones) aren’t too bad – fairly typical for the industry.  You can get a very nice R204GF-E antenna-less receiver for about $35.

Sanwa receivers are just plain expensive and by far the most of all radio manufacturers.  The cheapest receiver (you need FHSS-2 compatible) starts at about $60 and it just escalates quickly from there.  If you’re considering using this radio with more than one car, check into receiver prices before you make your decision.  They can really add up!

Conclusion:

The Flysky FS-GT3C is basically a cheap-ish Chinese version of what the Japanese companies offer, and it feels like one.  That’s not to say it doesn’t get the job done – it does, and if you are price-conscious, it is half the price of the other radios.  It has some weird driving characteristics and questionable build quality, but it has all the right features that you need and the included battery is a nice bonus.  It also turned our Slash 4x4 into an amazing jumping machine.

Of the two Japanese radios, I think the Futaba 3PV is probably a bit of a better radio as long as (and this is a big if!) you have longer fingers and can deal with the ergonomic issues.  The steering wheel is definitely better, but the throttle trigger is too long and slopes at an upward angle.  Try one before you buy.

That’s not to say the Sanwa MX-V is a bad radio – it isn’t.  It’s starting to feel a little dated next to the other two, but it’s a solid radio and probably the most durable of the group.  It’s definitely a quality transmitter and you won’t be disappointed if you buy one.  You can race with it, you can bash with it – it does everything competently.  If it dropped a few grams and got rid of the heavy controller springs, it could easily win this comparison.

Overall, we have to choose the Futaba 3PV as the winner.  It’s priced slightly higher than the others, but the feature list, the performance, its light weight, and the fact it won most of the categories puts it at the top of the list.

Winner:  Futaba 3PV

We hope you enjoyed this blog post and that it helped you in deciding on your next RC radio!

Monday, September 26, 2016

Slash 4x4 rear assembly attachment

This is not a particularly exciting post, but a little tip that might save you a few minutes of frustration is how I reattach the rear assembly on my Slash 4x4.

The Slash has a modular design so you can yank the whole front end off or the whole rear end off.  Putting the rear back on can be a little tricky because you have to align the slipper clutch shaft with the gear in the rear bulkhead, but the gear spins freely and won’t stay in place.

An easy way to make sure they’re lined up is to set the slipper shaft at horizontal.  It should stay in place by itself due to the magnets in the motor preventing the spur gear from turning.

Then set the rear assembly on the ground (or your table) on both wheels and the rear bumper.  This will form a stable tripod and will prevent the diff from turning.  Holding it with your right hand keeps it in position so you can slide the chassis on with your left hand.

It should go on easily without a lot of force since everything is lined up!

Thursday, September 22, 2016

Futaba 3PV / T3PV review


image

My Futaba 3PV came in!  Tower was having a good deal on this radio, so I picked one up and decided to do an update on the Futaba 3PL vs. Sanwa MX-V comparison.  That’ll come later, but first up is the review of the Futaba 3PV!
Scores in the following categories are rated from 1-10, with 5 being what I consider average in the class, and 10 being perfect.

Overview:
The 3PV is the new replacement for the venerable 3PL.  The 3PL was getting a little long in the tooth, and had run its course.  It had a few shortcomings, namely the menu system sucked and there was no expo control.  It also looked (and felt!) like you were holding Thor’s hammer…
The 3PV looks to rectify those shortcomings – at first glance, it’s a pretty stylish controller, has all of the right features, and is priced similarly to the 3PL at $109.99.
Now, this radio is sometimes referred to as the 3PV and sometimes it’s called the T3PV.  They’re the same radio, and it’s a little weird because the print on the radio says T3PV and the manual says 3PV.  If you look online at Futaba’s website and other places, it’s referred to by both names.  I’m not sure if they changed their mind on the name halfway through or what, but I’ll be calling it the 3PV in this review.

Features: 8
The radio has all the main adjustments you would expect from a good entry-level transmitter:  trim and sub-trim, steering and throttle EPA, dual-rate, and… (an upgrade from the 3PL) expo!  That was really my only gripe with the 3PL, you couldn’t adjust steering or throttle expo.  It also has an LCD display, internal antenna, 4 channels with 4WD/mixing and ABS.  Pretty much like the 3PL, but the LCD is much larger and centrally placed.  The radio supports 4 channels, but the 3rd channel is switched only, and the 4th channel can only be used in 4WS mode in conjunction with the steering channel.
This feature set is pretty standard for this category of radios, but it does have something unusual:  telemetry.
Well, not full telemetry – what the 3PV supports is receiver voltage (if you pay extra for the R304SB receiver version) and battery voltage (if you buy the $50 external sensor).  Receiver voltage isn’t that useful for electric vehicles, but could be useful for nitro. 
I use battery voltage on my Sanwa MT-S and MT-4S and find it incredibly helpful.  At $50 for the sensor and $50 per receiver, it’s a bit pricey to do the same with this system.  So it’s not quite the full telemetry you get with the high-end systems, and it’s a little pricey to even get battery voltage.  I expect most owners aren’t going to use voltage telemetry, but it’s there and certainly an added bonus.

Design: 8
What’s not readily apparent in the pictures is that this radio is tiny.  It’s elegant.  I’d call it petite, even.  It actually feels more like a 7/8th scale radio to every other radio in it’s class.  If I still had my 3PL, putting it side-by-side would be hilarious, as it is so much smaller.
I personally found it disconcertingly small at first, as I’ve never used a radio this small before, and I honestly felt a little uncomfortable walking around with such a small radio.  If you have size-compensation issues, this is not going to be the right radio for you…
But over time, I got used to it and started to like the small size, and…
…it’s also insanely light!  I weighed it at 262 grams (without the AA battery tray).  It’s gotta be the lightest radio in it’s class, by far, and is probably lighter than a lot of RTR radios.
The design is quite elegant, it has kind of a 4PX profile, but on a smaller scale.  It has a nice, fairly large easy-to-read LCD display.


image

At the top is a row of menu items that you can scroll through using the left and right arrow buttons.  The +/- buttons adjust the item you’re on.

Controls: 4
The handle is quite angled, compared to the Sanwas which uses a more upright handle.  It’s also quite thin, and fits small hands well.  The wheel is nice with a fairly light amount of tension, and has a very linear rate.  It measures at 51mm across, which is the perfect size to me and not humongous like the Spektrums.
One nice detail on the wheel is that the foam sits in a grooved channel unlike the 3PL.  This prevents the foam from sliding around left and right, which can be a problem on most radios.  I ended up gluing the foam down on the 3PL, but this nice design improvement will avoid that necessity.  Well done Futaba!
The trigger had a tiny bit of play, but the thing I noticed immediately (and did not like) is that there is an upward angle between the handle and the trigger.  In other words, the trigger sits a little higher than your hand, which means your finger has to sweep upward a little bit to reach the trigger.
This was kind of weird, and coupled with an angled handle meant that my trigger finger had to extend extra far and upward to brake.  Here you can see the upward sweep from grip to trigger in red, as compared to the MX-V in blue.  You can also see the more swept back grip.
If you’re familiar with fireams, the 3PV has more of an M-16 style grip, whereas the MX-V has more of a .45 Colt grip.


image

It doesn’t look like much, but trust me, you can feel it when using this radio.  I have short fingers, so this actually made it difficult to use the full length of the brake.  With long fingers, this is probably not as much of an issue.
Another thing is the trigger also goes all the way up flush with the underside of the transmitter at full brake, which means your finger tends to hit the underside of the transmitter.  I found this annoying and intrusive.


image

Trigger hole size is average sized:  I measured it at 17.1mm in diameter, which was a little big for my finger, but nothing untoward.  Trigger pull was measured at 14mm for throttle, and 6mm for brake, for a standard 70:30 ratio.  But the brake feels longer than that, as explained above.
Overall, the radio has a nice wheel, but the handle and trigger are not quite ergonomically correct in my opinion.  I have to give it lower marks for this reason.
Construction: 7
The plastics on the 3PV are nice and smooth, construction is solid, and there are no abnormal gaps are seams.  The plastics seem a little thinner and lighter than what I remember on the 3PL – that transmitter was a beast of a radio, and I dropped it many times and it took it like a champ.
The 3PV is probably not as robust as the 3PL.  The 3PL was a tank, and weighed like one too.
There is about a mm of play laterally on the trigger.  I didn’t notice it when driving, but it’s there.

Performance: 7
The radio feels pretty responsive to me, I did not notice any abnormal delays or lag.  I ran it in S-FHSS mode, which might be faster than standard FHSS, I’m not really sure, but it felt natural and quick.  I’m sure it’s not as quick as some of the high-end models, but for club racing I don’t think you’ll have any issues.  I’ll have to set it up in my 2WD stock buggy to get a better feel, but so far it seems fine.

Menu:  4
The menu system is fine – it shows you which adjustment you’re on, and you can cycle through them left and right.  But there’s one annoying thing about the system, there are 27 friggin’ items you have to cycle through to get back to the first one in the list!  I mean, that’s kind of crazy – fortunately you can go forward or backward in the list (the 3PL could only go forward), and you can go back to the battery main display by holding down a left/right button.  But that’s just too many selections for one menu, and it would’ve been nice if they had sub-menus or some other way to drill down rather have to cycle through all 27 of them.  For sheer annoyance factor alone, I have to give it a below-average score.

Binding: 7
Binding is super simple and couldn’t be easier.  You just turn everything on and press the bind button.  That’s it!  It supports 10 model memory, and model copy, which is a useful feature.
But something I noticed with Futaba radios that is different than some others, is that the receiver binds to the radio, but there is no model matching.  In other words, you could have a profile for your buggy, and one for your truck, but the receiver in your buggy is just going to bind to your radio.  If you switch your radio to the truck settings, it will still work with the buggy and it won’t know you’re driving in the wrong profile.  So you can accidentally be driving around in the wrong profile and not know it.
This is different than some other systems, where you HAVE to be in the truck setting and have your truck on to control it.  If you’re in the buggy profile, and turn your truck on, you can’t drive it until you switch to the buggy profile.

Battery: 8
The 3PV comes with a battery tray for 4 AA batteries, but you can remove that and plug in a LiPo or LiFe battery.  You can also buy a Futaba NiMh battery and use the integrated DC jack to charge the NiMh directly through the radio.  Lots of battery options!
I ran it with a LiFe stick battery which was a tight fit, you’ll want to get a more square battery if you go that route.
The 3PV shows you the battery voltage in nice big numbers on the display, so you’ll always know when it’s time to charge.  There is also an automatic power-off after 10 minutes of inactivity.  Handy little feature so you don’t accidentally drain your battery.

Manual:  9
The 3PV manual is complete and comprehensive and comes with a nice glossy cover and is printed on quality paper.  I didn’t find any errors, and it’s reasonably easy to read and refer to.  Yes, I did actually read the manual cover to cover!  (OK, I admit I skipped the warnings section).

Price: 5
The Futaba retails for $109.99 at the time of this post.  With coupons and discounts, I was able to get it for $96 - $10 rebate shipped, which is not overly expensive.  It’s not as cheap as the Chinese radios, but you kind of get what you pay for with those.  I’d say price-wise, this radio is middle-of-the-road.

Conclusion:  8
The Futaba 3PV is a good, much improved radio over its predecessor, the 3PL.  In this price range and class, it is one of the top radios on the market today.
Areas where it scores high marks are its elegant design, amazing light weight, big display, full set of features (including battery telemetry), and excellent battery options.  Performance seemed good, but its hard to tell without running it back to back with another radio.  Speaking of which…  I should have a comparison test with the Sanwa MX-V, and Flysky GT-3C in about a week.
I do have issues with the grip/trigger layout, enough that I recommend you test one out in person before buying if you can.  It’s honestly annoying enough that I may decide not to keep this radio, we’ll have to see how it stacks up against the other entry-level radios.  Stay tuned for an upcoming comparison review!

YouTube review:

Wednesday, September 21, 2016

Classes of RC radios/transmitters

I would categorize the transmitters out there into 4 different classes.  As you move up in price, you’re getting more features and adjustments.  Hopefully this post gives you an idea of what you’re paying for when you spend a little more for a radio.


RTR:  $40-60

RTR radios are, as the name implies, radios that come with ready-to-run vehicles. These are your basic, no-frills radios that are enough to get the job done, but are pretty limited in features and quality.  You can usually buy them standalone also.  They are the bare minimum to drive your car and adjust it.  You’ll get steering/throttle trim, dual-rate, servo reversing, and that’s usually it. 

If you’re lucky, you’ll get left/right EPA and maybe a 3rd channel control.  They generally feature 2 analog knobs to adjust steering and throttle trim, and a couple of switches for power and reversing.  Nowadays, they should all be 2.4 Ghz radios.


Examples: Traxxas TQi, Futaba 3PRKA, Spektrum DX2E, Tactic TTX300, Flysky FS-G2


Entry-level:  $100-$130

When you’re ready to upgrade your RTR radio, you’ll want to look at the next tier of transmitters.  The entry-level radios will have digital adjustments, internal antenna, radio battery voltage, multi-model memory, steering/throttle EPA, 3rd channel, LCD display and menu system, steering/throttle exponential, and sometimes a connector for a NiMh/LiPo/LiFe battery.  They also usually have some more advanced features like ABS, 4-wheel steering/mixing and possibly stability control (Spektrum AVC).  For me, these radios have pretty much the most basic set of features you’ll want and what I consider the bare minimum for a radio. 

Examples: Futaba 3PV, Sanwa MX-V, Flysky GT-3C, and Spektrum DX4C.


Mid-level:  $230-$300

Mid-level radios will have more advanced features, including telemetry, faster response times, model memory/copy/clear, back-lit display, a multi-level menu system, and definitely a battery plug for nimh/lipo/life batteries.  You’ll also get programmable buttons/knobs, adjustable expo curves, battery alarm, and timer.  These radios also usually use a faster/newer protocol (i.e. FAAST or FHSS-3/FHSS-4) and often have proprietary servos and ESCs you can use for faster controls.

On the ergonomics front, you get adjustable trigger positions and tensions, usually a drop-down wheel and different size grips.  They are definitely made to adjust to fit your particular hand for comfort.

Examples:  Futaba 4PLS, Sanwa MT-4S, Spektrum DX-4R


High-end:  $400+

I don’t own any high-end radios.  The radios I’m talking about are the Futaba 4PX, Sanwa MT-12S, and the recently released Spektrum DX-6C.  At this level, you get color displays, headphone jacks, and in the case of the DX-6C some seriously advanced features:  it runs Android, so you basically get a smartphone/transmitter combo in one and can run your browser, YouTube, or whatever app!  I expect this segment to go bonkers now that Spektrum has jumped the shark with regards to technology!

Monday, September 19, 2016

Hornet at the park

I was searching around on Google, and found out that a local city park had an “RC track” right by my work.  So of course I had to go check it out.  I mean an RC track at the park?!?

image

I brought the Hornet out and messed around for a battery.  It was a bit bumpy and needed a sweep, but made for a nice, relaxing lunch hour break.

Some more stuff I noticed about the Hornet – because the drivetrain is so heavy, the tires are basically the only form of suspension on the buggy, the shocks effectively don’t do anything.  So the softer the tire, the better, and you don’t want to run any foams.

I also realized the diff is completely open and has no limited slip effect at all.  It’s fine on asphalt/tarmac, but on dirt it’s pretty terrible.  I’m going to look into correcting that.

The track is split into two parts, a smooth section and a bumpy section with some small jumps.

image

I’ll definitely be back.

Sunday, September 18, 2016

Futaba 3PV/T3PV review on the way

Tower Hobbies was having a rebate promotion on Futaba radios, so I picked up a Futaba 3PV for $96 - $10 rebate, so basically it ended up being $86 shipped.  The radio should be here in a few days, so look for a review in a week or two.
I’m looking forward to seeing how this radio stacks up with my Sanwa MX-V and finding out which is the top dog $100 radio.  Stay tuned!

October 19, 2016 update:  The full comparison is here:
http://razorrcblog.blogspot.com/2016/09/entry-level-rc-radio-comparison-review.html

Thursday, September 15, 2016

Top 10 TLR 22 character flaws

I’m a big fan of my 22T 2.0.  It’s a fantastic truck, and one of the most fun vehicles I’ve had the pleasure to drive.  I also had a 22SCT 2.0 that never was hooked up for me in mid-motor, but I’ve got probably 100+ packs through these cars, and so feel I have a pretty good handle on their positive and negative attributes.

While every series of RC cars has their flaws, the 22 has its own uniqueness.  You can call it “character” or whatever, but these are the things that I’m not particularly fond of with the 22 series.  They’re good cars, and if these things were fixed, I’d say they’re damn near flawless.  While none of them are dealbreakers, they are the little things that get to me.

  1. Weak slipper:  the slipper isn’t too bad with 17.5 or 13.5t motors, but on the SCT with its big tires, and heavy chassis and a mod motor, the stock slipper really isn’t up to the task.  I find the slipper spring weak, and the pads glaze pretty easily and don’t provide the bite you need for a short course truck.
  2. Ballcups:  the HD ballcups are actually super smooth and fit nicely to the ballstuds, but they are not drilled from the top, so to remove a ballstud you have to pop them every single time.  They also are not the most durable, so if you pop them off a lot, they tend to stretch out a bit and come loose in collisions.  And then you have to replace them.
  3. 2-piece topshaft:  the topshaft is aluminum with a thin threaded steel rod that can come unthreaded.  It also tends to bend if you tighten the slipper down super tight.  The topshaft also uses a 5mm nut instead of a standard 7mm nut.  I mean, why?
  4. Mostly metric:  the 22 series is almost completely metric, but not quite.  There is a 0.05″ screw holding the rear pivot block in place, and there’s a 4-40 screw/nut in the bellcranks.  If it’s metric, just make it metric!  Which brings us to our next dislike:
  5. Bellcranks:  the steering bellcranks are an afterthought on the 22.  The original 1.0 cars came with a sliding steering rack, which was quite frankly, stupid, and they later retrofit a bellcrank system that barely fits.  But the plastic bellcranks get super sloppy.  The steering posts are also threaded aluminum that you have to thread in screws from the top and bottom, which means you have to somehow get loctite in there and they tend to rotate while you’re trying to screw them from one side or the other.  There are also these tiny little shims you need to get in there which tend to get bent or lost.  Could be better.
  6. Painted springs:  the springs are color coded with little dabs of paint that wear off.  And then you have no idea what springs are on there.  I ended up using colored 1/16″ heat shrink tubing to identify them.
  7. Plastics:  the plastics are good…  for about 15 packs.  Then they develop slop.  Now, the Associated 5-series also got sloppy fast, but the new B6 has amazing plastics that don’t develop slop.  So while it was OK the last few years, the other manufacturers have upped their game and left TLR in this regard.
  8. ESC on the battery:  I mean, come on!  the 22 (1.0, 2.0) and 22T were designed for you to mount the ESC above the battery?!?
  9. Anti-squat shims:  the 22 uses a bunch of little plastic shims to set the anti-squat, and a tiny little screw (that’s easy to break or lose) to hold them in place.  It’s pretty primitive – inserts/pills or different blocks are much nicer.
  10. CVDs:  this is kind of a nitpick, but the 22 uses grub screws to hold in the axles on the CVDs.  They can back out and tear up your hubs…  ask me how I know.  Other manufacturers use a captured system.

Honorable mention:  the E-clips in the shocks.  This is kind of a wash, because I hate E-clips, but I have to admit they’ve never come off (like the nuts on the Associated shocks).  So what are you gonna do?

Don’t get me wrong, I consider myself a Losi fan and I always root for the underdog.  I just thought this would help out those who want to know what flaws the 22 cars and trucks have.

Monday, September 12, 2016

Team Associated RC10 B6 / B6D axle heights (caster bushings, hubinserts) explained

One of the most confusing tuning options on the B6 is the ability to adjust axle heights front and rear.

In the front, there are included aluminum caster block bushings to adjust the height of the steering block relative to the arm.  This is an area where the B6D differs from the B6 – the B6D comes with 0 and 3mm bushings and the B6 comes with 1 and 2mm bushings.

In the rear, there are also plastic inserts for the rear hub so that you can again raise or lower the hubs.  So what is this for?  What does raising or lowering the hubs do?  The rear of the manual has a brief explanation, but people seem to think that the purpose of the caster hat bushings is to add or reduce steering.  That’s not actually true.

The real reason to adjust the bushings is to adjust the axle height when you raise or lower the chassis ride height.  Every time you want to raise or lower the ride height, you should make the corresponding change to the axle heights so that you keep the overall geometry of the arms and camber links (and steering links, and bump steer, and yada yada yada) the same.  You don’t want to just change out the bushings without re-setting the ride height (or vice versa), because then you are also changing chassis angle, camber link angles, and arm angles simultaneously.

For example, this is my buggy at 23mm ride height and with the front caster bushings at the +1mm position:


image


The arms are nice and flat and the camber links are set to where I like them.

Now if I make a drastic change and lower the ride height to something super low, the camber links (and resulting roll center) are also going to change drastically.  Take a look at the angle of the camber links when the chassis is dropped a ton in the front:


image


They have a massive downward angle, and you’ve effectively changed your roll center a bunch.
So the main purpose of axle height adjustment is to keep your arms relatively the same when changing ride height.  Then everything else (ballstuds, camber links, etc.) will remain the same and not need readjustment or have additional effects.
Reiterating:

Front axle height
  •   0 position:  3mm bushing on top, 0mm bushing on bottom
  • +1 position:  2mm bushing on top, 1mm bushing on bottom
  • +2 position:  1mm bushing on top, 2mm bushing on bottom
  • +3 position:  0mm bushing on top, 3mm bushing on bottom
The 0 and 3mm bushings come in the B6D kit, and the 1 and 2mm bushings come in the B6 kit.  You can also get the whole set with Associated part# 91676.

Rear axle height
  •   0 position:  0/3 insert with tab on top
  • +1 position:  1/2 insert with tab on top
  • +2 position:  1/2 insert with tab on bottom
  • +3 position:  0/3 insert with tab on bottom
As a general rule of thumb, for 23mm ride height, you want to run the axles pretty low, at the 0 or 1 positions.  And then for every 1-2mm of ride height drop, you want to raise the axle heights by about 1mm.

Sunday, September 11, 2016

HUDY setup station tips

I was trying to get my B6 more dialed in, so I threw it on the HUDY setup station to set camber and toe a little more accurately.

The HUDY station is pretty tricky to use, because you want to measure with it pretty close to your resting ride height position, but when it’s in the hangers, it’s at a different height.  So to get the best out of your station, here’s a couple of tips:

1. Wheel height is different than setup station height

image

The height of the axles is usually going to be higher than your actual wheel height.  In the case of my B6 with Pro-line Electron tires, the HUDY has my car’s front axles suspended about 4mm higher than it would be with the wheels mounted.  Measure the height of the HUDY axle mounting points, and then measure the radius of your wheels to see what the difference is.  That’s your height difference number.

So to set your toe and camber, you’d want to add that to your ride height gauge.  For example, I run my B6 at 23mm ride height front and rear, so I measure the front with a 27mm ride height gauge under the car and then check toe and camber.  In the back, my buggy is about 2mm higher in the station, so I stick a 25mm gauge under the rear when setting camber.  This will approximate the 23mm normal ride height I run in the rear.


2. Use a flat ride height gauge

image

I like the 110% Racing ride height gauges, but they only set the height at a single pinpoint.  When you’re pushing down on your car to set the ride height before measuring, you want to use something flat so that you don’t get any left-right tilt.  In this example, you can see when I push down on the buggy, the right side is more angled than the left, which is totally going to throw off your measurements!

You need your chassis completely level when measuring.

Tuesday, September 6, 2016

Tamiya Hornet: Grasshopper rear pivot conversion

One of the main differences between the Hornet and the Grasshopper is that the latter uses a fixed pivot in the front of the rear drivetrain while the Hornet uses a full-floating rear axle.

The entire rear drivetrain is one big, heavy unit.  It’s got the motor, wheels and tires, differential and rear axle on there as one big chunk of metal and plastic.

image


But the biggest issue is that it’s 500 grams of unsprung weight!  This means every time the rear wheels hit a bump, the entire half kilogram weight is knocked around.  Force = mass x acceleration, so that’s a lot of force being applied to the buggy.

image


The entire buggy only weighs about 1200 grams (with battery), so you’re talking 40% of the entire mass of the buggy is getting knocked around and disrupting the entire chassis.  What you have, is a case of the tail wagging the dog. When the tail weighs as much as the dog, there’s not a lot you can do to isolate the tail’s movement from the dog.  So what ends up happening is the rear drivetrain unit acts on its own, and there’s not a whole lot the chassis can do to dampen the jostling.

image


One of the “improvements” Tamiya made for the Hornet, was to implement a free-floating rear end, so that this whole drivetrain can move in any direction.  This is supposed to give it more suspension action, and I suppose it might give slightly better traction in loose conditions, but overall it makes the rear end very bouncy and very erratic.  Here’s a clip showing the completely free-floating rear end that can turn in basically any direction.

http://vid1238.photobucket.com/albums/ff497/captainr22/58A4F2EB-EC3E-4595-9EE1-2EDEAD2403C5.mp4


The original Grasshopper uses a fixed pivot point, so that any movement is limited to the up-and-down direction with the shocks.  It isolates the rear a bit more and makes it more controlled.  Personally, I think this is a superior design.  So I modified my Hornet with the Grasshopper pivot points, Tamiya part number 0005069 (Grasshopper parts tree “B”).  It’s an easy modification, you just remove the sliding rod and put on the Grasshopper mounts on each side.

http://vid1238.photobucket.com/albums/ff497/captainr22/DCE700B3-28F4-4637-8B58-79DA671589B3.mp4

This keeps the rear end a little more predictable and not hop around so much.  The downside is that there is absolutely no rear roll at all, but I find the straight-line suspension to work much better and the rear end more stable.  The car wanders less and is overall a more reliably handling buggy.